Posted on Leave a comment

ACS850 Inverter User’s Manual Overview

I. Introduction to ACS850 Inverter Features

The ABB ACS850 series inverter is a high-performance, multi-functional drive device designed specifically for industrial applications, supporting various motor types. Its key features include:

  • Extensive Power Range: Covering from 0.37 kW to 560 kW, catering to the needs of small to large-scale industrial applications.
  • High-Precision Control: Utilizing advanced control algorithms to provide precise motor control, including Direct Torque Control (DTC).
  • Modular Design: Easy to configure and expand, supporting multiple communication protocols and fieldbus interfaces.
  • Comprehensive Protection: Built-in multiple protection mechanisms to ensure stable system operation, including overcurrent, overload, and short-circuit protection.
  • User-Friendly Interface: Equipped with an intuitive control panel for easy operation and monitoring.
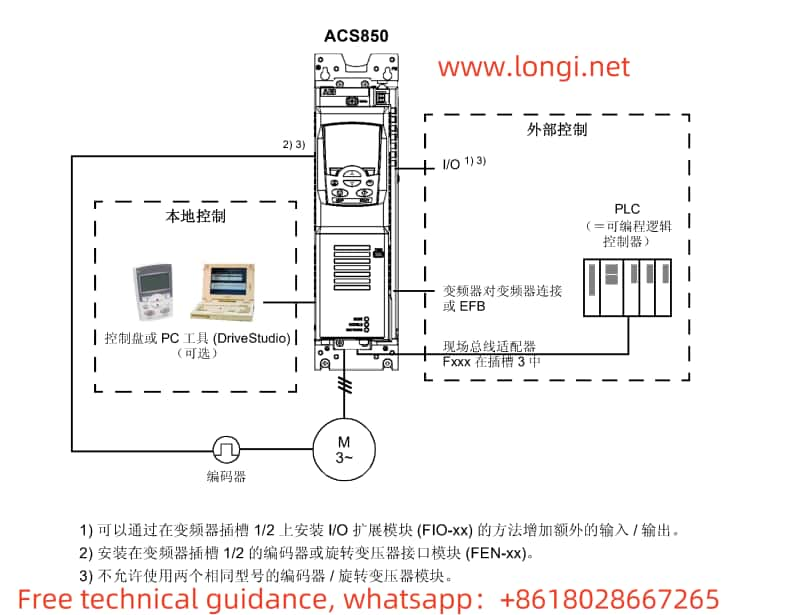
ACS850 inverter control framework diagram

II. Operating Instructions for ACS850 Inverter Control Panel

The control panel of the ACS850 inverter typically includes an LCD display, multiple function keys, and directional keys. While the specific key names may vary depending on the model or version of the control panel, the basic operation logic remains similar. The following are general instructions:

  • Menu Navigation: Use directional keys to move up, down, left, or right in the menu to select the desired function or parameter.
  • Parameter Setting: Enter the parameter setting menu, use directional keys to select specific parameters, and then adjust them using data increase/decrease keys.
  • Operation Control: The panel usually has clear control keys for start, stop, forward, reverse, etc., for direct control of the inverter’s operating status.
  • Display Switching: Some control panels may be equipped with dedicated keys to switch between different display modes or view alarm information.
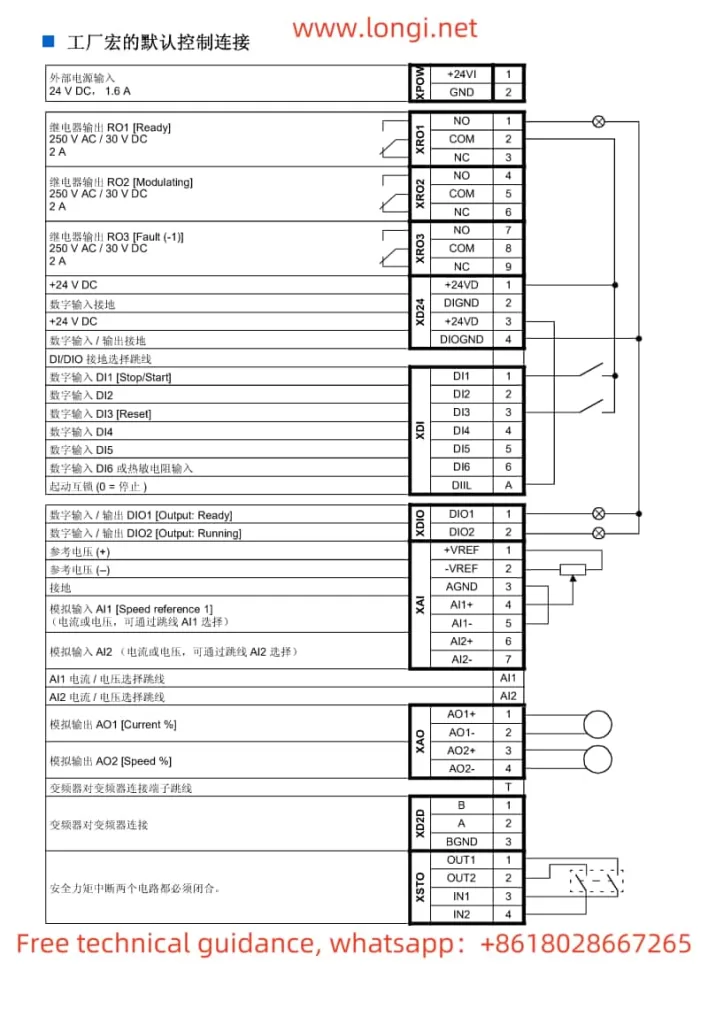
Default control connection for ACS850 inverter factory macro

III. Configuration Guide for Terminal Control Mode

When using terminal control mode, it is necessary to select the appropriate macro configuration and set relevant parameters based on application requirements. The following are general steps:

  • Select Macro Configuration: Based on the application type (e.g., fan/pump, compressor, etc.), select the suitable macro configuration in the inverter’s parameter settings. This typically involves presetting a series of related parameters to suit specific application needs.
  • Configure Input/Output Terminals:
    • Connect external control signals (e.g., start, stop, speed setting, etc.) to the corresponding input terminals.
    • Configure output terminals as needed (e.g., fault output, operating status output, etc.).
  • Set Control Parameters:
    • Adjust relevant control parameters according to the selected macro configuration, such as acceleration time, deceleration time, PID controller parameters, etc.
    • Ensure that AI1 (or other analog input terminals) is correctly configured as the speed setting input, and set appropriate scaling factors and offsets.
  • Save Settings and Test:
    • After saving all settings, test the inverter to ensure that all control signals are working as expected.
    • Check and eliminate any potential wiring errors or incorrect parameter configurations.

IV. Fault Code Analysis and Troubleshooting

The ACS850 inverter features a fault diagnosis function that displays corresponding fault codes when a fault occurs. Based on the fault code table (usually located in a specific chapter of the manual), users can quickly identify the problem and take appropriate measures. The following are some common fault codes and their troubleshooting suggestions:

  • 0001: Overcurrent fault. Check the motor, cables, and inverter output for normality; adjust the load or increase overload protection settings.
  • 0002: DC link overvoltage fault. Check the stability of the power supply voltage; consider increasing deceleration time or installing a braking resistor.
  • 0004: Motor short-circuit fault. Check the motor windings for short-circuits; replace the motor if necessary.

Note: The above steps and suggestions are based on a general description of the ACS850 series inverter. When performing specific operations, please refer to the ACS850 firmware manual and follow the official guidance provided by ABB. For any questions or issues, it is recommended to contact Longi Electromechanical Support for professional assistance.

Posted on Leave a comment

Fault Analysis and Resolution of ‘INH’ Alarm on Nidec Unidrive M300 and HS30 Servo Drive

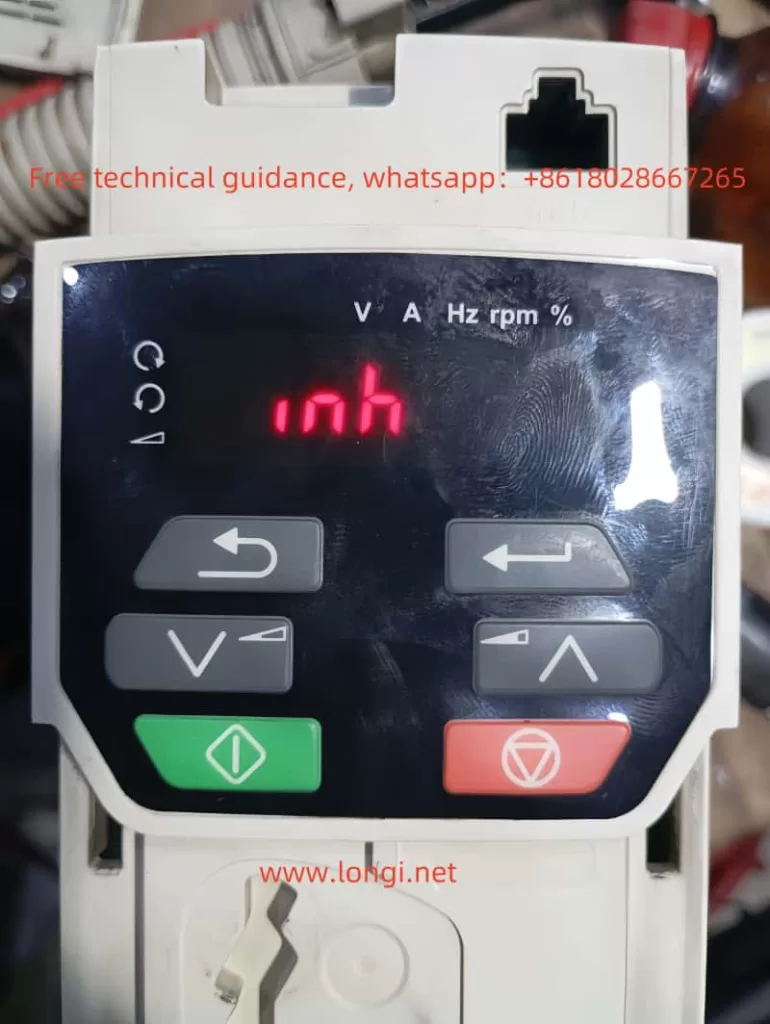
Analysis and Solution for “INH” Alarm in Nidec Unidrive M300 and HS30 Series Servo Drive

Fault Analysis

INH' Alarm on Nidec Unidrive M300 and HS30 Servo Drive
  • Safety Input Trigger:
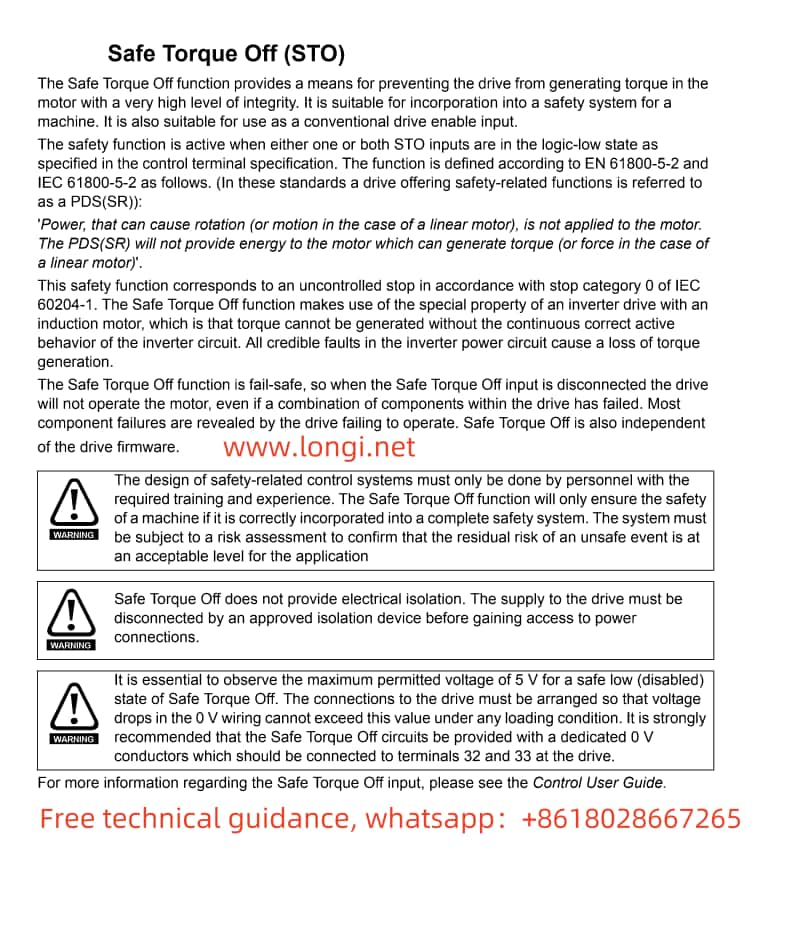
    • The Unidrive M300 and HS30 supports various safety functions, such as Safe Torque Off (STO). Activation of safety inputs, like STO signals, will place the drive in an inhibit state, preventing unintended motor rotation.
  • Control Parameter Settings:
    • Parameter P06.015 (Drive Enable) is one of the key control parameters, used to enable or disable drive output. When P06.015 is set to 0 (disabled), the drive will be in an inhibit state.
  • External Control Signals:
    • Incorrect configuration or faults in other external control signals, such as remote control signals, may also cause the drive to enter an inhibit state.
  • Drive Faults:
    • Although uncommon, internal drive faults or software issues may also result in “INH” alarms.

Solution Methods

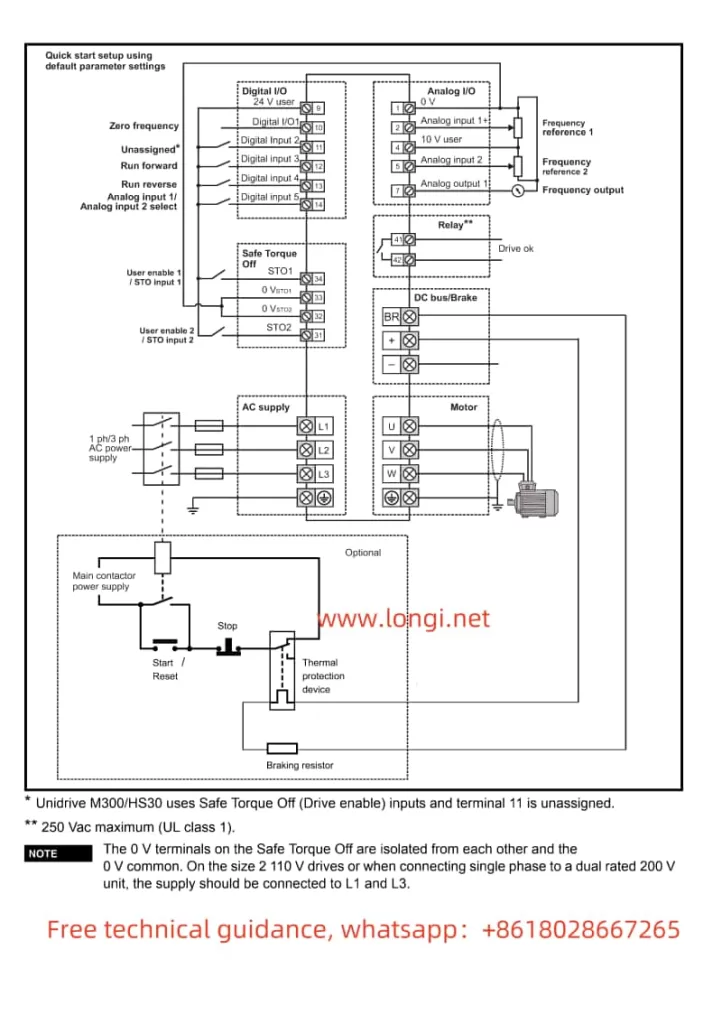
Detailed description of STO function
  • Check Safety Inputs:
    • Confirm that all safety inputs (e.g., STO signals) are correctly connected and in the desired state. Check if external safety devices (e.g., emergency stop buttons) have been reset.
  • Verify Control Parameters:
    • Check the setting of parameter P06.015 through the drive’s Human Machine Interface (HMI) or configuration software. Ensure the parameter is set to 1 (enabled) to allow drive output.
  • Inspect External Control Signals:
    • Verify the wiring and logic of all external control signals (e.g., remote control signals). Ensure no erroneous signals are causing the drive to enter an inhibit state.
  • Restart the Drive:
    • After confirming all configurations are correct, attempt to restart the drive. Sometimes a simple restart can resolve issues due to software hangs or communication errors.
  • View Fault Records:
    • Use the drive’s fault diagnosis function to check for any other related fault records. These records may provide additional clues leading to the “INH” alarm.
  • Contact Technical Support:
    • If the above steps fail to resolve the issue, it is recommended to contact Nidec’s technical support team for further assistance.

Special Attention to Parameter P06.015

M300 servo wiring diagram and STO external wiring
  • Pre-modification Confirmation:
    • Before modifying P06.015 or any critical control parameters, ensure an understanding of the specific role and impact of the parameter, and consult relevant documentation or technical support.
  • Safe Operation:
    • Before making any modifications, ensure the drive and motor are in a safe state to avoid unexpected start-ups or damage to the equipment.

By following these steps, you should be able to diagnose and resolve the “INH” alarm issue on the Unidrive M300 servo drive. If the problem persists, consider seeking professional assistance from Longi Electromechanical.

Posted on Leave a comment

Theta VFD T8 Series User Guide

I. Procedure for Viewing and Modifying Function Codes on the T8 Series VFD Operator Panel

  1. Starting the Operator Panel:
    • After powering on the VFD, press the power button (labeled “POWER” or similar symbol) on the operator panel to activate it.
  2. Viewing and Modifying Function Codes:
    • Use the directional keys (↑↓←→) on the operator panel to select the desired function code for viewing or modification.
    • Press the “ENTER” key to enter edit mode, where you can input new parameter values using the numeric keys or view the current values.
    • After making changes, press “ENTER” again to confirm the modifications and exit edit mode.
    • Note: Access to some advanced function codes may require entering a password.
  3. Parameter Structure and Status Parameter Review and Setting:
    • VFD parameters are typically grouped, such as motor parameters (P0 group), control parameters (P1 group), and protection parameters (P2 group).
    • To review specific parameters, refer to the parameter table in the manual to find the corresponding parameter number (e.g., P0.01, P1.05) and parameter description.
    • Status parameters (e.g., current frequency, current, voltage) can be directly viewed through specific function codes, providing real-time insights into the VFD’s operating status.
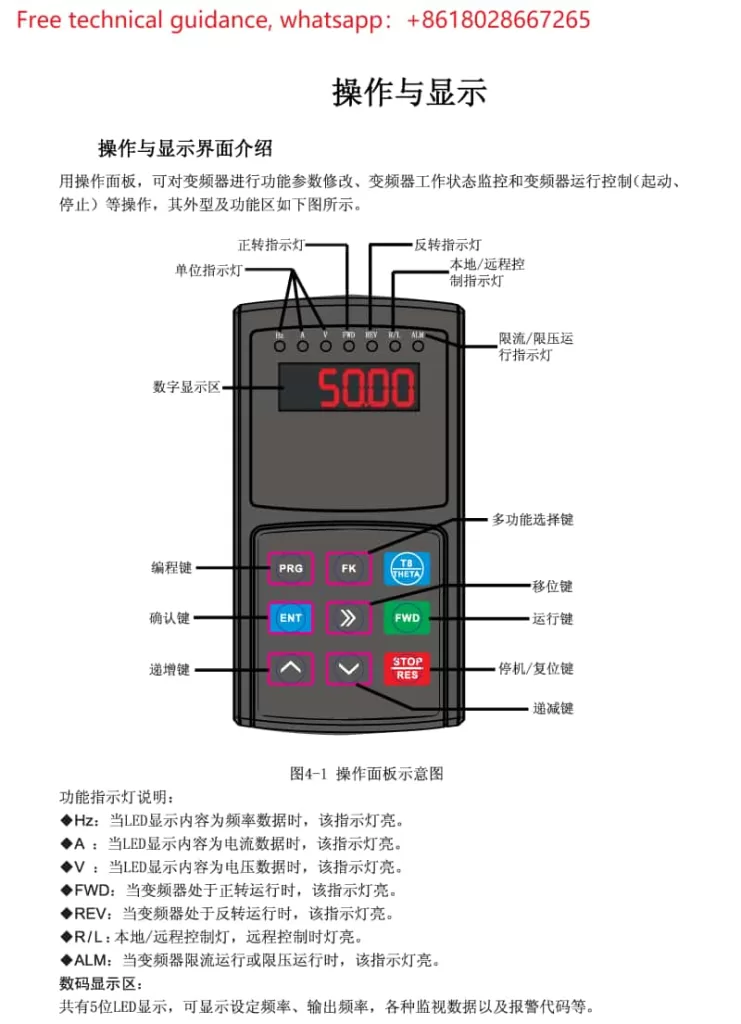
Operation panel buttons and display instructions diagram

II. Explanation of Control Circuit Terminals and Wiring Methods for the T8 VFD

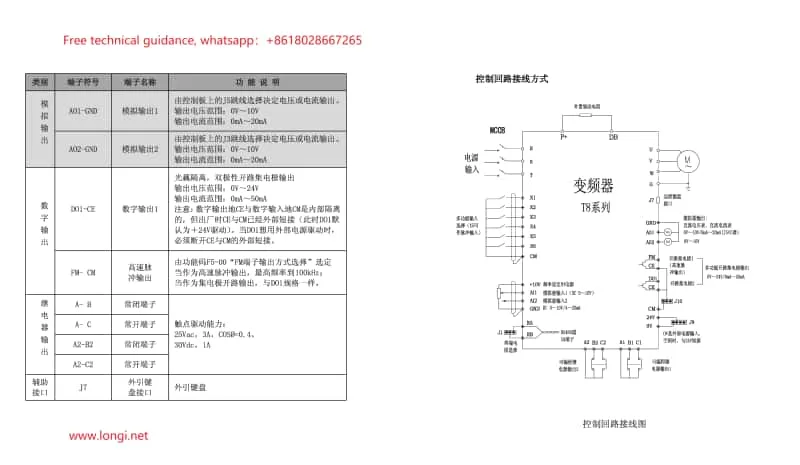
  1. Explanation of Control Circuit Terminals:
    • FWD/REV (Forward/Reverse Control Terminals): Connect to external buttons or switches to control the VFD’s forward and reverse rotation.
    • RUN/STOP (Run/Stop Control Terminals): Control the VFD’s start and stop functions.
    • AI1/AI2 (Analog Input Terminals): Receive analog signals from potentiometers, PLCs, etc., for frequency adjustment.
    • FAULT (Fault Output Terminal): Outputs a signal to external devices when the VFD detects a fault.
    • RUN (Run Indicator Light): Illuminates when the VFD is in the running state.
  2. Wiring Methods for the Control Circuit:
    • Connect the corresponding control signal wires to the designated terminals based on actual control requirements.
    • When using terminal start and potentiometer adjustment, ensure:
      • Analog input parameters are set correctly, including input type (voltage/current) and range.
      • The frequency setting method is selected as “Analog Input.”
      • Forward/reverse control parameters are set according to actual needs.

III. Explanation and Resolution of VFD Fault Codes

T8 inverter control circuit wiring diagram

Based on the specific instructions in the “Theta VFD T8 Series Manual,” here are some common fault codes and their resolutions:

  • OC (Overcurrent Fault): Check if the motor and load are excessively large, optimize motor parameters or load distribution; inspect motor insulation for integrity.
  • OV (Overvoltage Fault): Verify input voltage stability, use a voltage stabilizer if necessary; inspect power lines for abnormalities.
  • UV (Undervoltage Fault): Check the input power source for normalcy, troubleshoot power supply issues; inspect power lines for poor contact.
  • OH (Overheat Fault): Improve ventilation conditions, reduce ambient temperature; check for blocked heat sinks and clean dust inside the VFD.
  • EF (External Fault): Verify the normalcy of the external fault signal source; inspect the wiring of external devices for secure connections.

Please note that this content is a summary of the user guide based on select sections of the “Theta VFD T8 Series Manual.” Always refer to the original manual for detailed steps, precautions, and any additional information. For questions or further assistance, consult the manual or contact longi VFD’s technical support department.

Posted on Leave a comment

MotiFlex e180 Servo Drive Wiring, Debugging,manual,and Fault Handling Guide

I. Main Circuit Wiring Instructions

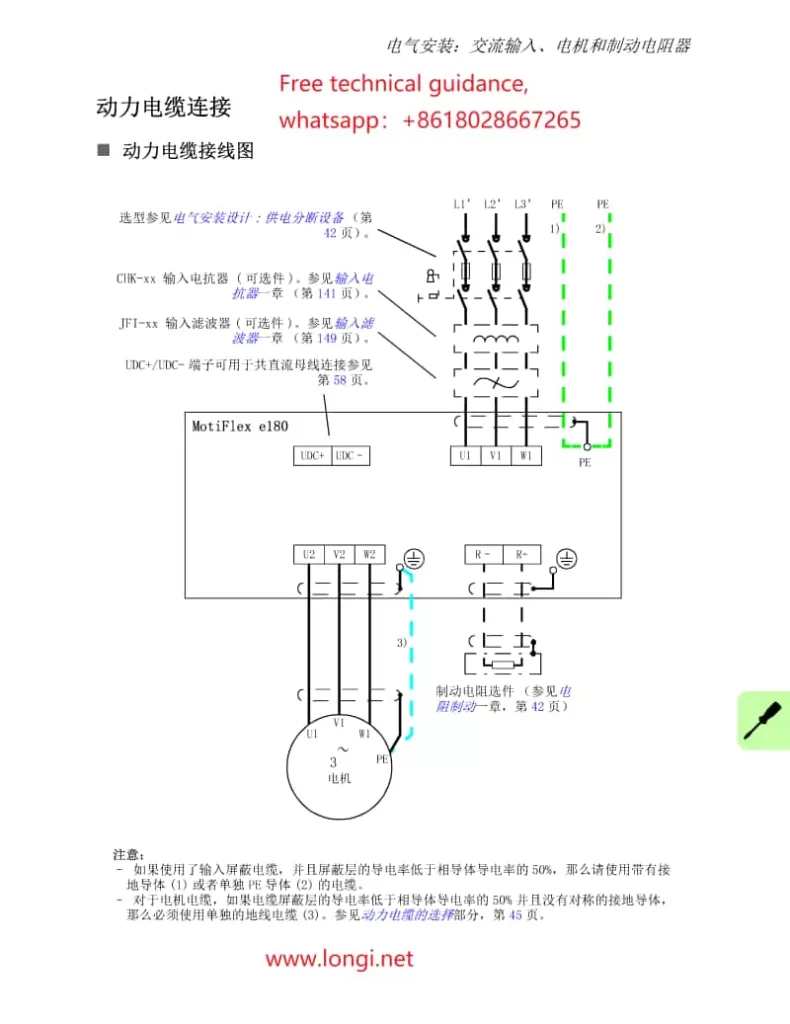
  1. Power Supply Wiring
    • The MotiFlex e180 servo drive supports three-phase AC power input, typically ranging from 200V to 480V AC, depending on the selected model.Before wiring, ensure the power supply is switched off and disconnected to avoid the risk of electric shock.
  2. Wiring Steps:
    • Verify that the power supply voltage and frequency meet the drive requirements.
    • Connect the three phases (L1, L2, L3) and ground wire (PE) of the power supply to the drive’s input terminals using appropriately sized cables.
    • Ensure secure cable connections and check that the cable shielding is properly grounded.
  3. Motor Wiring
    • Connect the motor cable to the drive’s motor output terminals (U, V, W), ensuring the motor ground wire (PE) is also properly connected.
    Wiring Steps:
    • Check that the motor model and rated parameters match the drive.
    • Use appropriately sized motor cables to connect the three-phase wires (U, V, W) and ground wire (PE) to the corresponding output terminals of the drive.
    • Tighten the cable connectors to ensure a reliable connection.
MotiFlex e180 servo main circuit wiring diagram

II. Control Circuit Wiring Instructions

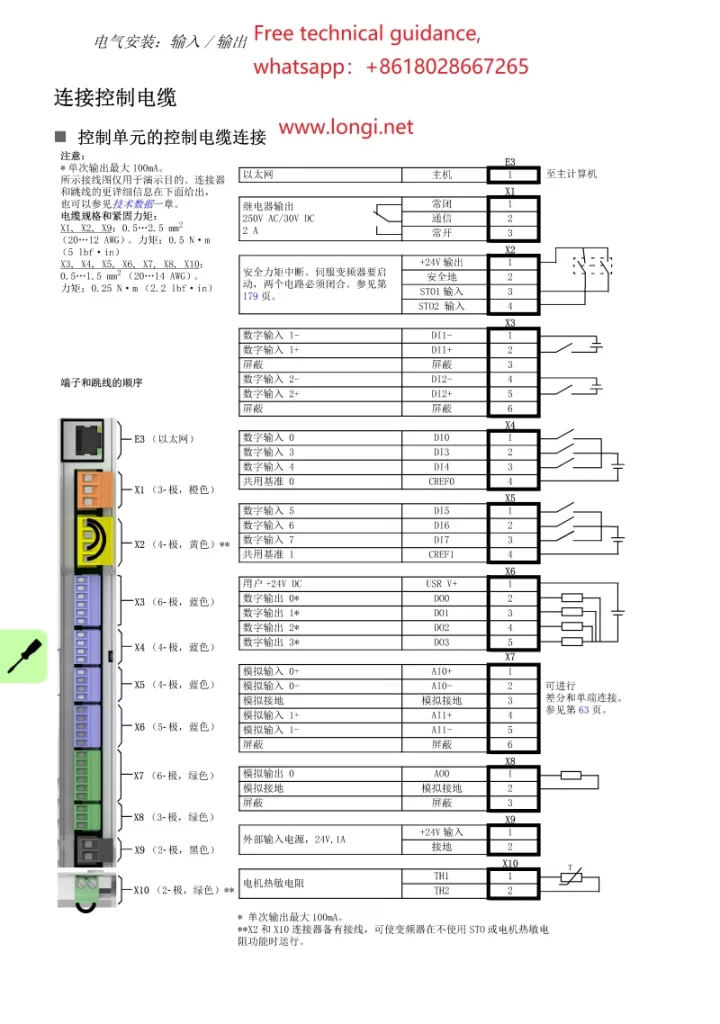
  1. I/O Interface Description
    • The MotiFlex e180 provides a rich set of I/O interfaces, including Digital Input (DI), Digital Output (DO), Analog Input (AI), and Analog Output (AO) for communication and control with external devices or controllers.
    • DIs receive switching signals from external devices, such as start, stop, and emergency stop.
    • DOs send control signals to external devices, such as alarm output and motor running status indication.
    • AIs receive analog signals, such as speed setting and position feedback.
    • AOs output analog signals, such as drive current and voltage feedback.
  2. Control Circuit Wiring
    Wiring Steps:
    • Prepare suitable control cables, ensuring that the cable specifications and length meet the requirements.
    • Connect the control cables to the corresponding I/O interfaces according to the drive wiring diagram. Pay attention to distinguishing between inputs and outputs, as well as positive and negative polarity.
    • For digital outputs requiring external power (e.g., relay outputs), ensure that the external power specifications meet the requirements and are correctly wired.
IO Function Description and Control Circuit Wiring Diagram of ABB Server MotiFlex e180

III. Debugging MotiFlex e180 Servo Drive with Mint WorkBench

  1. Installing and Configuring Mint WorkBench
    • Download and install Mint WorkBench software: Obtain the latest version of Mint WorkBench from the ABB official website and follow the installation guide to complete the installation.
    • Connect the drive: Use an Ethernet cable to connect the computer to the MotiFlex e180’s E3 port, and configure the computer’s network adapter to ensure it is in the same subnet as the drive’s IP address.
  2. Starting and Debugging
    • Launch Mint WorkBench, create a new project, and select to connect to the MotiFlex e180 servo drive.
    • Run the debugging wizard: In Mint WorkBench, start the debugging wizard, follow the prompts to input motor and drive parameters, and proceed with automatic adjustment and performance testing.
    • Monitoring and Adjustment: Use the monitoring window to view the drive status in real-time and make manual adjustments as needed to optimize drive performance.
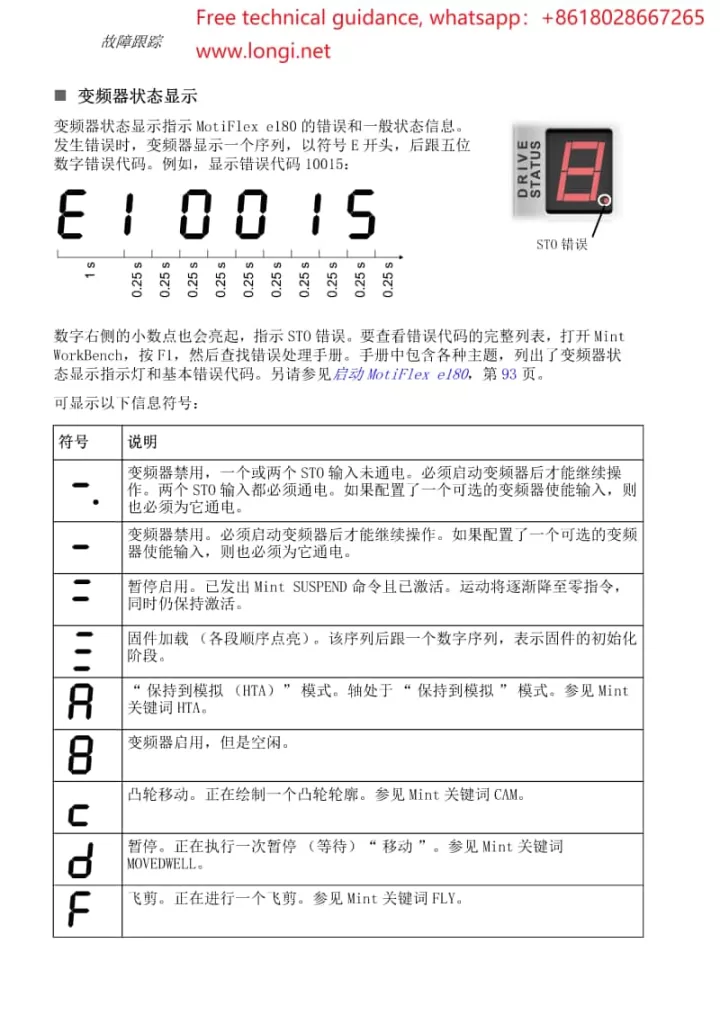
ABB server MotiFlex e180 status display

IV. Fault Code Analysis and Solutions

  • Error Code 10033 (ecSTO_ACTIVE): Indicates that the STO (Safe Torque Off) function is active.
    • Cause: The STO input signal is not energized.
    • Solution: Check the wiring and power supply of the STO input signal to ensure normal operation.
  • Error Code 10015 (Overcurrent Protection): Indicates that the drive has detected an overcurrent condition.
    • Cause: Excessive motor load, motor or cable short circuit, etc.
    • Solution: Inspect motor and cable connections, ensure no short circuits or overloads; adjust the load or reduce the operating speed.
  • Error Code 20006 (Axis Alarm): Indicates abnormal encoder feedback data.
    • Cause: Incorrect encoder wiring, encoder failure, or interference with the feedback signal.
    • Solution: Check encoder wiring, replace faulty encoders, or increase signal shielding measures.

By following these steps, you can effectively debug the MotiFlex e180 servo drive using Mint WorkBench and resolve common fault issues. For further questions, please contact us for a detailed manual or free technical support.

Posted on Leave a comment

DC Power Analyzers: Principles, Operation Guide, and Comprehensive Fault Repair Manual

DC Power Analyzers: Principles, Operation Guide, and Comprehensive Fault Repair Manual

I. Overview

DC Power Analyzers are high-precision testing devices specifically designed to measure and analyze various parameters of DC power sources, such as output voltage, output current, power, and efficiency. They play an indispensable role in modern electronic systems, power monitoring, renewable energy generation systems, and battery testing and management. These analyzers provide accurate measurements of power parameters, assisting engineers in evaluating power performance, verifying design specifications, and conducting fault diagnosis and optimization.

II. Principles

The working principle of DC Power Analyzers is based on real-time measurement and sampling of input and output voltages and currents, with subsequent calculation of related parameters through internal algorithms. The instrument typically consists of multiple components, including input/output interfaces, measurement circuits, data processing units, and display units. During measurement, the analyzer captures changes in voltage and current in real time, converts and processes these signals through built-in high-precision sensors and signal processing circuits, and finally displays the results on the screen in digital or graphical form.

III. Operation Guide

Preparation Stage:

  • Place the DC Power Analyzer on a stable workbench and preheat it by connecting to the power supply.
  • Select appropriate voltage and current ranges according to the requirements of the device under test, and set corresponding parameters.

Connecting the Device Under Test:

  • Use suitable connection cables to connect the power input terminal of the device under test to the output terminal of the DC Power Analyzer.
  • Ensure secure and reliable connections to avoid poor contact or short circuits.

Starting Measurement:

  • Activate the DC Power Analyzer and select the corresponding measurement mode and functions as needed.
  • The instrument will automatically start measuring and recording data, and users can observe the measurement results in real time on the display screen.

Data Analysis:

  • After measurement, the DC Power Analyzer will provide detailed measurement reports and data charts.
  • Users can evaluate and analyze power performance based on these data, identify potential issues or abnormalities, and take corresponding measures for repair and optimization.

Ending Operation:

  • After measurement, turn off the DC Power Analyzer and disconnect it from the device under test.
  • Clean the work area and properly store the instrument for future use.

IV. Fault and Repair Methods

Unable to Turn On:

  • Check if the power plug is securely inserted into the socket and if the power cord is damaged.
  • If the power is normal but the instrument cannot be turned on, it may be due to internal circuit failure or battery depletion. Contact professional maintenance personnel for inspection and repair.

Display Abnormalities:

  • If the display screen shows garbled characters, a black screen, or flickering, it may be due to display screen failure or system firmware issues.
  • Try restarting the instrument and updating the firmware to resolve the issue. If the problem persists, replace the display screen or perform system repairs.

Inaccurate Measurement:

  • Inaccurate measurements may be caused by sensor aging, calibration failure, or environmental interference.
  • Calibrate or replace the sensors as needed, and ensure a stable and interference-free measurement environment.

Communication Failures:

  • If the DC Power Analyzer cannot communicate with a computer or other devices, it may be due to damaged communication interfaces or mismatched communication protocols.
  • Check the secure connection of the communication interface and confirm correct communication protocol settings. If the issue remains unresolved, contact professional maintenance personnel for inspection and repair.

Other Faults:

  • Faults such as malfunctioning buttons or inaccurate knob adjustments may be caused by wear or damage due to long-term use.
  • Replace the corresponding components to restore the normal function of the instrument.

V. Brands and Models of DC Power Analyzers Repaired by Longi Electromechanical

  1. Keysight Technologies
    • N6705C: DC Power Analyzer
    • N7900 Series: N7906A, N7950A
    • N6700 Series: N6702C, N6705B
  2. Tektronix
    • PA1000: Single-Phase Power Analyzer
    • PA3000: Three-Phase Power Analyzer
    • PA4000: Multi-Phase Power Analyzer
  3. Chroma
    • 66205: Precision Power Analyzer
    • 66203: Three-Phase Power Analyzer
    • 66204: Four-Phase Power Analyzer
  4. Yokogawa
    • WT3000E: High-Precision Power Analyzer
    • WT5000: Precision Power Analyzer
    • WT300E Series: WT310E, WT330E
  5. Rohde & Schwarz
    • NRP Series: NRP6AN, NRP18AN
    • R&S HMC804x Series: HMC8041, HMC8042, HMC8043
  6. GW Instek
    • PSW Series: PSW30-108, PSW160-13.5
    • GPP Series: GPP-4323, GPP-3060
  7. Rigol Technologies
    • DP800 Series: DP831A, DP832A, DP821A
  8. B&K Precision
    • 9129B: DC Power Analyzer
    • 9130B Series: 9130B, 9131B
    • MR3000 Series: MR3000
  9. EA Elektro-Automatik
    • PSI 9000 Series: PSI 9000 2U, PSI 9000 3U
    • ELR 9000 Series: ELR 9000
  10. ITECH
    • IT7600 Series: IT7602, IT7603
    • IT6500 Series: IT6512C, IT6522C
  11. Delta Elektronika
    • SM15K Series: SM15K
    • ES Series: ES030-5, ES150-10
  12. Magna-Power
    • XR Series: XR500-12, XR1000-6
    • TS Series: TS250-60, TS500-30
  13. Sorensen (AMETEK Programmable Power)
    • DLM600 Series: DLM600-1, DLM600-2
    • SGA Series: GA600-1, SGA600-2
  14. TDK-Lambda
    • GENH Series: GENH 10-200, GENH 20-100hi
    • Z+ Series: Z+200-10, Z+800-2
  15. Agilent: N6705B, N6705C, N6715B, N6715

Longi Electromechanical Company has nearly 30 years of experience in repairing DC Power Analyzers and can quickly repair various instruments. Additionally, we offer recycling and sales services for various DC Power Analyzers. Welcome to consult.

Posted on Leave a comment

Signal Generators: Principles, Brands,Operation Guides, and Troubleshooting

Signal Generators: Principles, Operation Guides, and Troubleshooting

I. Overview

Signal generators, also known as signal sources or oscillators, are devices capable of producing various waveforms, frequencies, and amplitudes of electronic signals. They play a crucial role in the field of electronic technology, widely used in testing, calibration, and experimentation. By simulating the excitation signals required by devices under test in real-world environments, signal generators assist engineers and technicians in accurately measuring and analyzing the performance parameters of electronic circuits and equipment.

II. Principles

[Image 2: Principles of Signal Generators]

The working principle of signal generators is based on oscillator theory, which generates stable electronic signals through internal circuit oscillations. Specifically, signal generators produce a reference frequency through a signal source (such as a crystal oscillator or reference signal). This frequency is then adjusted in terms of output signal frequency and amplitude through frequency control circuits and amplitude control circuits. Different types of signal generators may employ various oscillation circuits and modulation techniques to produce signals of specific waveforms. For example, sine wave signal generators typically utilize RC or LC oscillation circuits, while pulse signal generators may leverage gate circuits or switching circuits to generate pulse signals.

III. Operation Methods

  1. Power Connection: First, connect the signal generator to an appropriate power source and ensure a stable connection.
  2. Parameter Setting: Set the output signal type (e.g., sine wave, square wave, pulse wave), frequency, amplitude, and phase of the signal generator as needed, using knobs, keyboard inputs, or menu options.
  3. Output Connection: Connect the output port of the signal generator to the device or measurement system under test, ensuring correct connection.
  4. Calibration and Verification: Before formal testing, calibrate and verify the signal generator to ensure the accuracy and stability of the output signal.
  5. Testing Initiation: Start the signal generator to produce the required signal and proceed with experimentation, testing, or debugging.
  6. Output Monitoring: Use appropriate measurement equipment (e.g., oscilloscopes, spectrum analyzers) to monitor the output signal of the signal generator, checking parameters such as frequency, amplitude, waveform, and stability for consistency with expectations.
  7. Parameter Adjustment: Adjust the parameters of the signal generator as needed to meet specific testing requirements or application needs.
  8. Testing Completion: After testing, stop the signal generator and gradually disconnect it from the test equipment or measurement system.

IV. Troubleshooting and Repair Methods

[Image 4: Troubleshooting and Repair Methods]

  1. Power Issues: Power failures are common in signal generators. Check for secure power cord connections and normal power supply. Replace the power cord or faulty power supply if necessary.
  2. Display Issues: If the display is unreadable, unstable, or shows incorrect content, it may be due to display screen failure, display driver circuit failure, or system firmware issues. Check for secure display connections, restart the device, update firmware, or replace the display screen.
  3. Output Issues: Unstable output signal amplitude, incorrect frequency, or waveform distortion may result from output circuit failure, clock synchronization issues, or interference from external sources. Check output circuit connections, inspect clock synchronization circuits, and eliminate interference sources.
  4. Control Issues: Malfunctioning control buttons or inaccurate adjustments may be caused by control circuit failure, control software issues, or faulty buttons. Check control circuit connections, restart the device, update software, or replace buttons.
  5. Connection Issues: Loose connections, poor contact, or line failures between the signal generator and the device under test can lead to abnormal test signal output. Ensure secure connections, reinsert connection cables, and repair line failures.
  6. Calibration Issues: An improperly calibrated signal generator can result in output errors, frequency deviations, or amplitude distortions. Perform regular calibration and adjust parameters and signal sources according to calibration requirements to ensure accurate output.
  7. Cooling Issues: Signal generators generate heat during operation and require an effective cooling system. Cooling system failures can lead to device overheating, affecting performance and lifespan. Check for properly functioning cooling fans, clean ventilation holes, and ensure a smooth cooling system.
  8. Noise Issues: Noise in the output signal can affect the accuracy of test results. Check for interference in signal source input and output lines, and add shielding and filters to eliminate noise.

In summary, signal generators are vital equipment in the field of electronic testing, and their principles, operation methods, and troubleshooting methods are crucial for ensuring test accuracy and device reliability. By operating and maintaining signal generators correctly, their important role in the field of electronic technology can be fully leveraged.

V. Brands and Models of Signal Generators Repaired by Longi Electromechanical

  1. Keysight Technologies
    • MXG X-Series: N5181B (Analog), N5182B (Vector)
    • EXG X-Series: N5171B (Analog), N5172B (Vector)
    • UXG X-Series: N5193A (Vector)
  2. Rohde & Schwarz
    • SMW200A: High-Performance Vector Signal Generator
    • SMB100A: Analog Signal Generator
    • SMA100B: High-Performance Analog Signal Generator
    • SGT100A: Vector Signal Generator
  3. Tektronix
    • AWG70000 Series: AWG70001B, AWG70002B
    • AFG31000 Series: AFG31151, AFG31251
  4. Anritsu
    • MG3690C Series: MG3691C, MG3692C, MG3693C
    • MG3710E: Vector Signal Generator
  5. National Instruments (NI)
    • PXIe-5451: Vector Signal Generator
    • PXIe-5653: Vector Signal Generator
  6. Signal Hound
    • USB-SG44: USB Vector Signal Generator
    • USB-SG44A: High-Performance USB Vector Signal Generator
  7. B&K Precision
    • 4050B Series: 4051B, 4052B, 4053B
  8. Rigol Technologies
    • DSG800 Series: DSG815, DSG830
    • DSG3000 Series: DSG3060, DSG3030
  9. Stanford Research Systems (SRS)
    • SG380 Series: SG382, SG384
  10. Tabor Electronics
    • WW1071: High-Performance Arbitrary Waveform Signal Generator
    • WX2184C: High-Speed Arbitrary Waveform Signal Generator
  11. Aim-TTi
    • TGR2051: General-Purpose Signal Generator
    • TGR2050: High-Performance Signal Generator
  12. Boonton
    • SGX1000 Series: SGX1003, SGX1006
  13. Marconi Instruments
    • 2024: General-Purpose Signal Generator
    • 2031: High-Performance Signal Generator
  14. Aeroflex / IFR
    • 2025: General-Purpose Signal Generator
    • 3410 Series: 3410, 3412
  15. Agilent: E4421B/E4421A/E4422B/E4422A

Longi Electromechanical has nearly 30 years of experience in repairing signal generators and can quickly repair various types of instruments. Additionally, we recycle and sell various signal generators. Welcome to consult.

Posted on Leave a comment

Polarimeter: Detailed Principles, User Guide, and Comprehensive Fault Repair Guide

Polarimeter: Detailed Principles, User Guide, and Comprehensive Fault Repair Guide

I. Overview

The polarimeter is a precision optical instrument primarily used to measure the optical rotation of substances exhibiting chirality. Optical rotation, a measure of how a substance rotates polarized light, enables the analysis and determination of substance concentration, content, and purity. Polarimeters find wide application in pharmaceutical production, drug inspection, sugar manufacturing, food processing, chemical industry, petroleum, as well as in scientific research and education for laboratory analysis and process quality control.

II. Principles

The working principle of the polarimeter is based on the phenomenon of optical rotation exhibited by substances on polarized light. Natural light, after passing through a polarizer, becomes plane-polarized light. When this plane-polarized light passes through a chiral substance, its vibration direction rotates by a certain angle, known as the optical rotation. The polarimeter measures the angle change before and after the polarized light passes through the chiral substance to determine its optical rotation. Specifically, the polarimeter employs a light source that emits light, which, after passing through a color filter and a polarizer, forms plane-polarized light. This light rotates when it passes through a polarimeter tube containing the chiral substance, and is then observed and measured through an analyzer and an eyepiece assembly to obtain the optical rotation value.

III. Usage Instructions

Preparation:

  • Place the polarimeter on a stable workbench, connect the power supply, and preheat until the light source stabilizes (usually 5-10 minutes).
  • Check if all components of the instrument are intact and the polarimeter tube is clean and free of impurities.

Zero Calibration:

  • Turn on the instrument and use a blank solvent (e.g., distilled water) for zero calibration.
  • Inject the blank solvent into the polarimeter tube, place it in the sample chamber, adjust the analyzer to the zero position, and ensure uniform field brightness.
  • Repeat the operation several times to ensure the instrument’s stability and reliability.

Sample Testing:

  • Inject the sample into the polarimeter tube, ensuring no bubbles and that the tube is fully filled.
  • Place the tube back in the sample chamber, adjust the analyzer to the appropriate position for optimal field brightness.
  • Read and record the displayed optical rotation value.

Repeated Measurements and Averaging:

  • For improved accuracy, repeat measurements on the same sample and take the average as the final result.

Completion:

  • After testing, turn off the instrument, clean the polarimeter tube and sample chamber, return the instrument to its place, and make usage records.

IV. Faults and Repair Methods

Light Source Faults:

  • If the light source does not illuminate or is insufficiently bright, check the power supply, bulb integrity, and optical path clearance.
  • Replace the bulb or clean the optical path to resolve the issue.

Unstable Readings:

  • Fluctuating readings may result from environmental temperature changes, lack of calibration, or loose mechanical parts.
  • Ensure the instrument is used in a constant temperature environment, calibrate regularly, and check the tightness of mechanical parts.

Polarimeter Tube Contamination:

  • Contamination of the polarimeter tube’s inner wall affects measurements.
  • Regularly clean the inner wall with a dedicated cleaner and soft cloth, avoiding scratches.

Circuit Faults:

  • Circuit issues, such as the instrument not turning on or no display, may result from poor power cord connection, blown fuses, or damaged circuit boards.
  • Check power cord connections, replace fuses, or contact professional repair personnel for circuit board faults.

Mechanical Part Damage:

  • Damaged mechanical parts, such as stiff analyzer rotation or loose eyepiece assemblies, affect measurement accuracy and stability.
  • Regularly inspect mechanical parts for damage and replace them promptly to ensure proper instrument operation.

V. Brands and Models of Polarimeters Repaired by Longi Electromechanical

  1. Anton Paar
    • MCP Series: MCP 100, MCP 150, MCP 200, MCP 300, MCP 500
  2. Rudolph Research Analytical
    • Autopol Series: Autopol I, Autopol II, Autopol III, Autopol IV, Autopol V, Autopol VI
  3. JASCO
    • P Series: P-2000, P-1010, P-1020, P-1030, P-2000
  4. Schmidt+Haensch
    • Polartronic Series: Polartronic M, Polartronic H532, Polartronic V, Saccharomat
  5. Bellingham + Stanley (Xylem)
    • ADP Series: ADP440+, ADP450, ADP600, ADP660
  6. Atago
    • POLAX-2L: Automatic Polarimeter
    • DigiPol Series: DigiPol-781, DigiPol-782
  7. A.KRÜSS Optronic
    • P Series: P3000, P8000, P8000-TF
  8. Thermo Fisher Scientific
    • Orion Series: Orion 420
  9. HORIBA Scientific
    • SEPA Series: SEPA-200
  10. MRC Lab
    • POL Series: POL-1/2, POL-2/2, POL-3/2
  11. Shanghai Insmark Instrument
    • WZZ Series: WZZ-2B, WZZ-3, WZZ-3A
  12. PerkinElmer
    • 341 Series: Model 341
  13. Rudolph Instruments
    • Autopol Series: Autopol I, Autopol II, Autopol III
  14. DigiPol Technologies
    • DigiPol Series: DigiPol-781, DigiPol-782
  15. Hahnshin Scientific
    • HP Series: HP-300, HP-500

Longi Electromechanical Company specializes in polarimeter repairs with nearly 30 years of experience, ensuring quick and efficient repairs for various instruments. Additionally, we offer polarimeter recycling and sales. For more information, please contact us.

Posted on Leave a comment

Cone Penetrometer: Principles, Operation Guide, and Comprehensive Maintenance Manual

I. Overview

1. Introduction
The cone penetrometer, a specialized material testing device, is primarily used to measure the hardness or consistency of various coatings, paints, chemical products, and greases. By simulating a standard conical probe applying pressure to the sample surface and measuring its insertion depth, it assesses the sample’s resistance or hardness. The cone penetrometer, known for its simplicity, wide applicability, and high measurement accuracy, finds extensive use in industrial manufacturing, scientific research, and medical fields.

II. Principles

2. Working Mechanism
The cone penetrometer operates based on the indentation method in mechanics. It incorporates a standard conical probe (commonly referred to as the cone) and a pressure gauge (or displacement sensor). During testing, the cone is vertically pressed into the sample surface under a preset pressure, and the pressure gauge records the depth of cone penetration into the sample. This depth value reflects the sample’s resistance under given pressure, indicating its hardness or consistency. Multiple tests at different positions and directions, followed by averaging, ensure the accuracy and reliability of the measurement results.

III. Operation Guide

3. Preparation
Ensure the cone penetrometer is in good working condition. Check the cone for cleanliness and damage. Prepare the sample to be tested. Depending on the test requirements, adjust the instrument’s temperature, pressure, and other parameters.

4. Sample Preparation
Place the sample on a flat testing platform, ensuring the sample surface is smooth and free of impurities. For tests requiring specific temperatures, heat or cool the sample to the designated temperature.

5. Cone Installation
Attach a clean cone to the instrument’s standard rod and secure it. Adjust the instrument’s level to ensure the cone can vertically penetrate the sample surface during testing.

6. Testing Procedure
Start the cone penetrometer and begin testing according to preset parameters. The cone gradually penetrates the sample surface under pressure, and the pressure gauge records the cone’s insertion depth in real-time. The instrument automatically stops the test upon reaching the preset time or depth.

7. Data Reading
After testing, read the cone’s insertion depth value from the instrument. For improved measurement accuracy, perform multiple tests at different positions and directions and calculate the average.

8. Cleanup and Maintenance
After testing, promptly clean the cone and testing platform. Remove and properly store the cone’s protective oil. Regularly maintain and calibrate the instrument to ensure long-term stable operation.

IV. Common Faults and Repair Methods

9. Cone Wear or Damage

  • Symptom: Inaccurate or highly variable measurement results.
  • Repair Method: Inspect the cone for wear or damage and replace it if necessary. Ensure the cone is securely installed and its surface is clean and free of impurities.

10. Pressure Gauge Failure

  • Symptom: Incorrect display of cone insertion depth or unstable readings.
  • Repair Method: Check the pressure gauge’s connecting wires and sensors for proper function. If faulty, contact the manufacturer or professional repair personnel for repair or replacement.

11. Insufficient Instrument Levelness

  • Symptom: Test results significantly influenced by test position, with poor consistency.
  • Repair Method: Readjust the instrument’s levelness to ensure the cone can vertically penetrate the sample surface during testing. Use a level bubble or other tools for calibration.

12. Power or Circuit Fault

  • Symptom: Instrument failure to start or sudden shutdown during operation.
  • Repair Method: Check the power cord and plug for secure connection and proper power supply. For circuit faults, contact professionals for troubleshooting and repair.

13. Other Mechanical Faults

  • Symptom: Issues such as excessive instrument noise or restricted movement.
  • Repair Method: Inspect instrument components for looseness or damage and tighten or replace as necessary. Regularly lubricate and maintain the instrument to reduce mechanical wear and fault occurrence.

V. Brands and Models of Cone Penetrometers Repaired by Longi Electromechanical

  • Anton Paar
    • PMA.S: Cone penetrometer for grease and asphalt testing.
    • PMA.G: High-precision cone penetrometer for various samples.
  • Humboldt
    • H-1240: Automatic cone penetrometer for asphalt and soil.
    • H-1240.4F: Automatic cone penetrometer with cooling function.
  • Cannon Instrument Company
    • CAV-2000: Fully automatic cone penetrometer for grease and asphalt.
    • CAV-2100: High-precision cone penetrometer with touchscreen control.
  • Metrohm
    • 856: High-precision cone penetrometer for grease, asphalt, and food.
  • PIVOT
    • PIVOT Cone Penetrometer: Suitable for grease and asphalt.
  • ELE International
    • Digital Penetrometer: High-precision digital cone penetrometer for soil and asphalt.
  • Controls Group
    • Automatic Digital Penetrometer: Automatic digital cone penetrometer for asphalt and soil.
  • Testmak
    • Automatic Penetrometer: High-precision automatic cone penetrometer for various materials.
  • Koehler Instrument Company
    • K19500: Automatic cone penetrometer for grease, asphalt, and food.
    • K95500: High-precision cone penetrometer with touchscreen control.
  • PAC L.P. (Petroleum Analyzer Company)
    • Herzog HCP 5: High-precision automatic cone penetrometer for grease and asphalt.
  • Brookfield Ametek
    • BF35: High-precision cone penetrometer for grease and asphalt.
  • Stanhope-Seta
    • Seta Penetrometer: Digital automatic cone penetrometer for grease and asphalt.
  • Matest
    • A062: Automatic digital cone penetrometer for asphalt and grease.
  • TAMSON Instruments
    • TPC-72: High-precision cone penetrometer for grease and asphalt.
  • IKA
    • PEN 10: High-precision cone penetrometer for grease, asphalt, and food.

Longi Electromechanical Company specializes in the repair of cone penetrometers, with nearly 30 years of experience. We can quickly repair various instruments and also offer recycling and sales services for cone penetrometers. Welcome to consult.

Posted on Leave a comment

Thin Layer Chromatography (TLC) Spotters: Principles, Brands,Usage, and Common Fault Repairs

Thin Layer Chromatography (TLC) Spotters: Principles, Usage, and Common Fault Repairs

I. Overview

Thin Layer Chromatography (TLC) Spotters are precision instruments specifically designed for TLC analysis. They play a crucial role in accurately and uniformly applying samples onto TLC plates, significantly enhancing the precision and repeatability of sample application. This, in turn, boosts the accuracy and efficiency of TLC analysis through automation.

II. Principles

The working principle of TLC Spotters is based on precise control and positioning technology. The main components include a sample injection system, a moving platform, a control system, and an application needle. During operation, the control system precisely controls the movement and sample release of the application needle according to preset parameters such as sample volume, application position, and application speed. The needle releases the sample solution at a constant speed and pressure onto the specified position on the TLC plate, forming uniform and regular sample spots.

III. Usage

Preparation:

  • Ensure the TLC plate is clean, flat, and placed on the moving platform of the spotter.
  • Prepare an appropriate amount of sample solution based on analytical requirements.

Parameter Setting:

  • Set parameters such as sample volume, application position, and application speed through the spotter’s control interface.
  • Ensure these parameters meet analytical requirements.

Sample Loading:

  • Inject the sample solution into the sample injection system of the spotter.
  • Check for bubbles or impurities in the sample to avoid affecting application quality.

Starting Application:

  • Start the spotter, and the control system will automatically control the movement of the application needle to the specified position, releasing the sample solution at the set speed and pressure.
  • Observe the movement trajectory of the needle and the formation of sample spots during the application process.

Completing Application:

  • After application, turn off the spotter and remove the TLC plate for subsequent analysis.
  • Check the uniformity and consistency of the applied spots.

IV. Common Faults and Repair Methods

Uneven Application:

  • Causes: Blocked needle, bubbles or impurities in the sample solution, too fast or too slow application speed.
  • Repair Methods: Clean the needle, ensure the sample solution is pure and free of impurities, adjust the application speed to an appropriate range.

Offset Application Position:

  • Causes: Inaccurate positioning of the moving platform, control system failure.
  • Repair Methods: Calibrate the moving platform to ensure accurate positioning; check control system connections and settings, and repair or replace if necessary.

Sample Leakage:

  • Causes: Poor sealing of the sample injection system, damaged needle.
  • Repair Methods: Inspect and replace sealing components, repair or replace the damaged needle.

Control System Failure:

  • Causes: Power supply failure, software errors, hardware damage.
  • Repair Methods: Check power supply connections and stability, restart or upgrade the software; for severe hardware damage, contact the manufacturer or professional repair personnel for replacement or repair.

Other Faults:

  • Faults such as mechanical component jamming and excessive noise should be investigated and repaired based on specific situations.

V. Brands and Models of TLC Spotters Repaired by Longi Electromechanical

  1. CAMAG
    • Linomat 5: Manual TLC Spotter
    • Automatic TLC Sampler (ATS 4): Automatic TLC Spotter
    • Nanomat 4: Manual Spotter for Small Volume Samples
  2. Analtech
    • Spiral Plater: Automatic TLC Spotter
    • Spotter 9: Automatic Spotter for Routine Applications
  3. Desaga (SARSTEDT)
    • AS 30: Automatic TLC Spotter
    • AS 3000: High-Throughput Automatic Spotter
  4. Merck (MilliporeSigma)
    • TLC Autosampler: Automatic TLC Spotter
    • Automatic TLC Sampler 4 (ATS 4): High-Precision Automatic Spotter
  5. Shimadzu
    • Chromatopac C-R6A: High-Precision Spotter with Analytical Functions
  6. Biostep
    • Digisampler: Digitally Controlled Automatic TLC Spotter
  7. Knauer
    • BlueSpotter: Automatic TLC Spotter for Rapid Application and High-Throughput Analysis
  8. SiliCycle
    • SiliTLC: Manual Spotter for Various Applications
  9. Sciencix
    • TLC Spotter: Available in both manual and automatic models, suitable for various sample types
  10. IKA
    • TLC Spotting Station: Modular design suitable for various experimental needs

Longi Electromechanical Company has nearly 30 years of experience in repairing TLC spotters and can quickly repair various types of instruments. Additionally, we offer recycling and sales services for various TLC spotters. Please feel free to consult us.

Posted on Leave a comment

Precision Chillers: Working Principle, Usage, and Common Fault Repair Guide

Precision Chillers: Working Principle, Usage, and Common Fault Repair Guide

I. Overview

Precision chillers are efficient and stable industrial auxiliary equipment widely used in fields requiring precise temperature control, such as laboratories, semiconductor manufacturing, pharmaceutical production, and plastic processing. By circulating cooling water or other cooling media, they provide a constant low-temperature environment for various equipment and systems, ensuring process stability and product quality.

II. Working Principle

The working principle of precision chillers is based on the heat exchange principle in thermodynamics. The main components include a compressor, condenser, evaporator, expansion valve, and water circulation system. The specific working principle is as follows:

  • Refrigerant Cycle: The refrigerant is compressed into high-temperature, high-pressure gas by the compressor, then enters the condenser where it releases heat through a cooling fan or natural cooling, condensing into high-pressure liquid. After passing through the expansion valve, the high-pressure liquid enters the evaporator, evaporates and absorbs heat under low pressure, absorbing heat from the circulating water and lowering its temperature.
  • Water Circulation System: Low-temperature cooling water is pumped to the equipment or system needing cooling, absorbs heat, and then returns to the evaporator for re-cooling, forming a closed cycle.
  • Automatic Control System: Through temperature sensors and controllers, the water temperature is monitored and adjusted in real-time to ensure it remains stable within the set range. The system is also equipped with protection and alarm devices to prevent equipment overload, refrigerant leakage, and other abnormalities.

III. Usage

  1. Installation and Debugging: Install the precision chiller correctly according to the equipment manual, and connect the water source, power supply, and drainage pipeline. Conduct a comprehensive inspection before starting to ensure all components are tightly connected and leak-free. Then, proceed with debugging and set the required water temperature and range.
  2. Startup and Operation: Turn on the power and start the compressor and water pump. Observe the indicator lights and display on the control panel to ensure the equipment is running normally. Adjust the water temperature and flow rate as needed to meet the cooling requirements of different equipment and systems.
  3. Maintenance and Upkeep: Regularly check the water quality and level of the cooling medium, and replace or replenish as necessary. Clean the surface dust and dirt on the condenser and evaporator to improve heat dissipation efficiency. Regularly inspect the operating status of key components such as the compressor and water pump, and promptly identify and address potential faults.

IV. Common Faults and Repair Methods

  1. Insufficient Cooling Water Flow: Check if the water pump is working normally and if there are any blockages or leaks. Clear debris and dirt from the water pump inlet and outlet to ensure smooth water flow. If the water pump is severely damaged, replace it with a new one.
  2. High Water Temperature: Check if the condenser’s heat dissipation effect is good and if there is any dust or debris affecting heat dissipation. Clean the dust and dirt on the condenser surface and ensure the cooling fan is running normally. If the problem persists, it may be due to insufficient or leaking refrigerant; replenish the refrigerant and check for leakage points for repair.
  3. Compressor Fault: The compressor is one of the core components of the precision chiller, with common faults including overload, overheating, and starting difficulties. Check the compressor’s operating current and voltage for normality, and listen for any abnormal sounds or vibrations. If the compressor is severely damaged, replace it with a new one.
  4. Control System Fault: Issues such as inaccurate temperature display or control failure may be due to a damaged temperature sensor or controller fault. Check if the temperature sensor is damaged or detached, and replace it if necessary. If the controller fault is severe, replace it with a new one or seek professional repair.
  5. Other Faults: For issues such as pipeline leaks and damaged electrical components, take corresponding repair measures based on the specific situation. Promptly identify and address fault points to ensure the equipment resumes normal operation.

V. Common Faults and Repair Methods for Specific Models

  • JULABO
    • F Series: FL2503, FL3003, FL601
    • FC Series: FC600, FC1200
  • Lauda
    • Proline Series: RP 845, RP 1290
    • Ultracool Series: UC 6, UC 12
  • Huber
    • Unichiller Series: Unichiller 003-MPC, Unichiller 005-MPC, Unichiller 009-MPC
    • Minichiller Series: Minichiller 300, Minichiller 600
  • Thermo Fisher Scientific
    • ThermoFlex Series: ThermoFlex 900, ThermoFlex 1400, ThermoFlex 2500
    • NESLAB HX Series: HX-150, HX-300, HX-750
  • PolyScience
    • DuraChill Series: DuraChill 6000, DuraChill 8000
    • Benchtop Chillers Series: 6000 Series, 8000 Series
  • VWR
    • VWR Series: VWR 1177PD, VWR 1180S, VWR 1187MD
  • Buchi
    • F Series: F-105, F-108, F-114
  • LabTech
    • H Series: H50-500, H50-1000
  • Peter Huber Kältemaschinenbau AG
    • Minichiller Series: Minichiller 300, Minichiller 600
    • Unichiller Series: Unichiller 003-MPC, Unichiller 005-MPC
  • Across International
    • Ai Series: Ai C30-25, Ai C30-40
  • JULABO USA, Inc.
    • FL Series: FL1200, FL2500, FL4003
  • Yamato Scientific
    • AD Series: AD-100, AD-200
  • Edwards
    • nXDS Series: nXDS6i, nXDS10i, nXDS15i
  • TAEevo Tech
    • TAEevo Tech Series: TAEevo Tech 051, TAEevo Tech 101
  • Grant Instruments
    • LT Ecocool Series: LT ecocool 150, LT ecocool 250
  • Haake (Thermo Scientific)
    • Phoenix II Series: Phoenix II C40P, Phoenix II C50P
  • Solid State (Japan)
    • ThermoCube
    • AHP-1202CPHC

Note: Longi Electromechanical Company has nearly 30 years of experience in repairing precision chillers and can quickly repair various instruments. They also recycle and sell various precision chillers. For inquiries, please contact us.