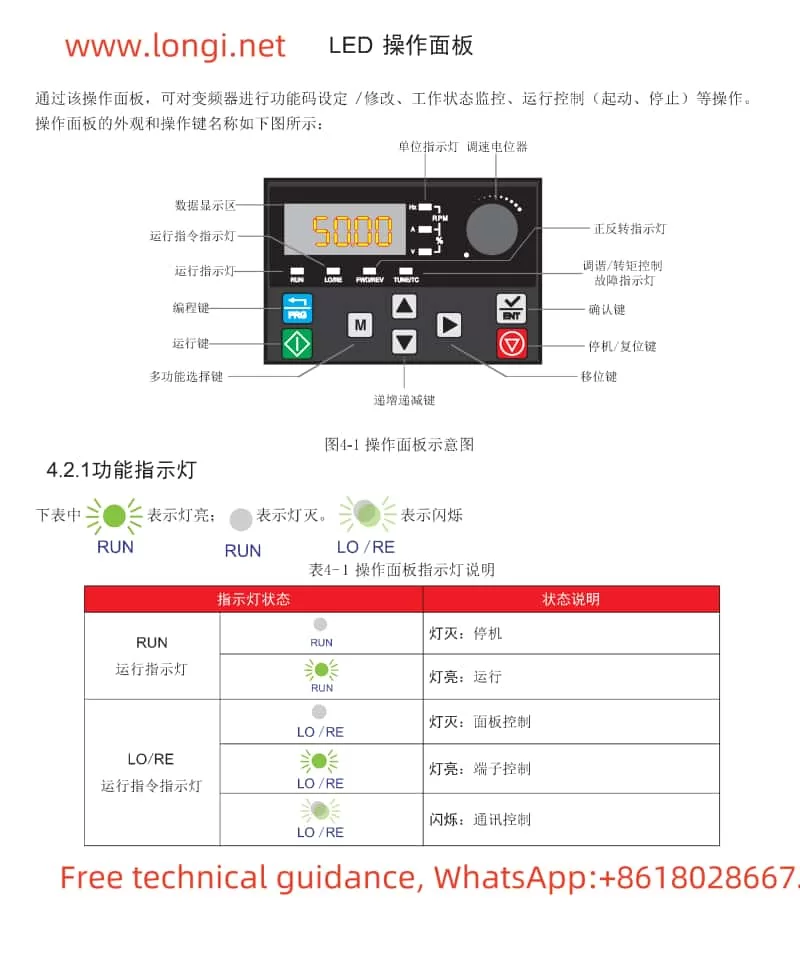
I. Introduction to Operation Panel Functions and Basic Settings
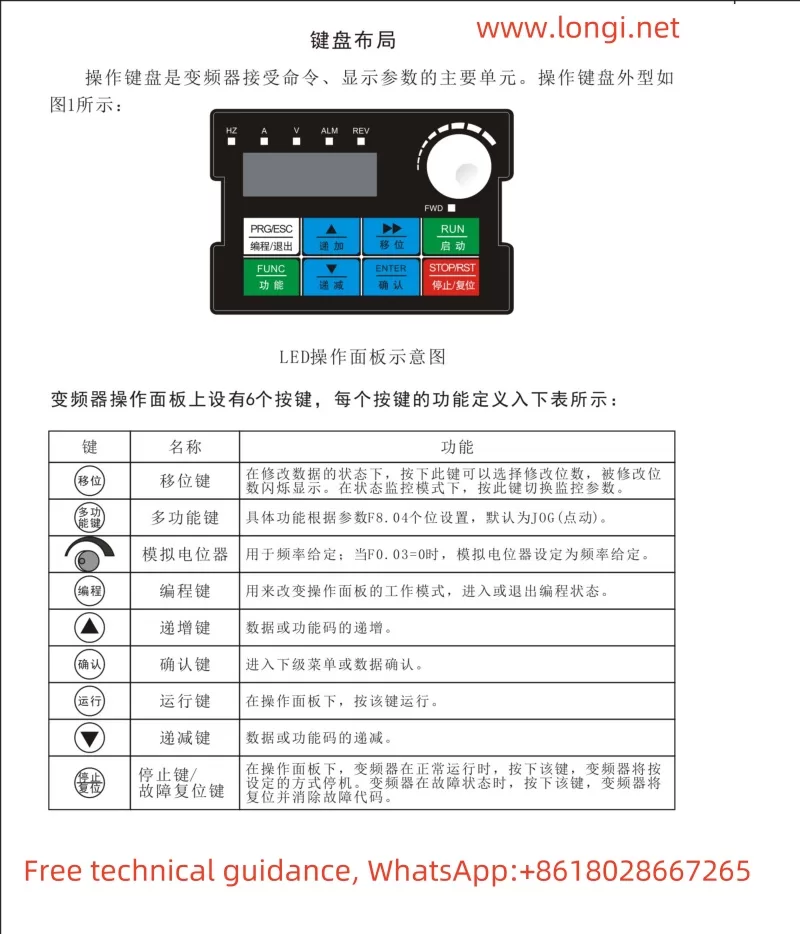
1.1 Introduction to Operation Panel Functions
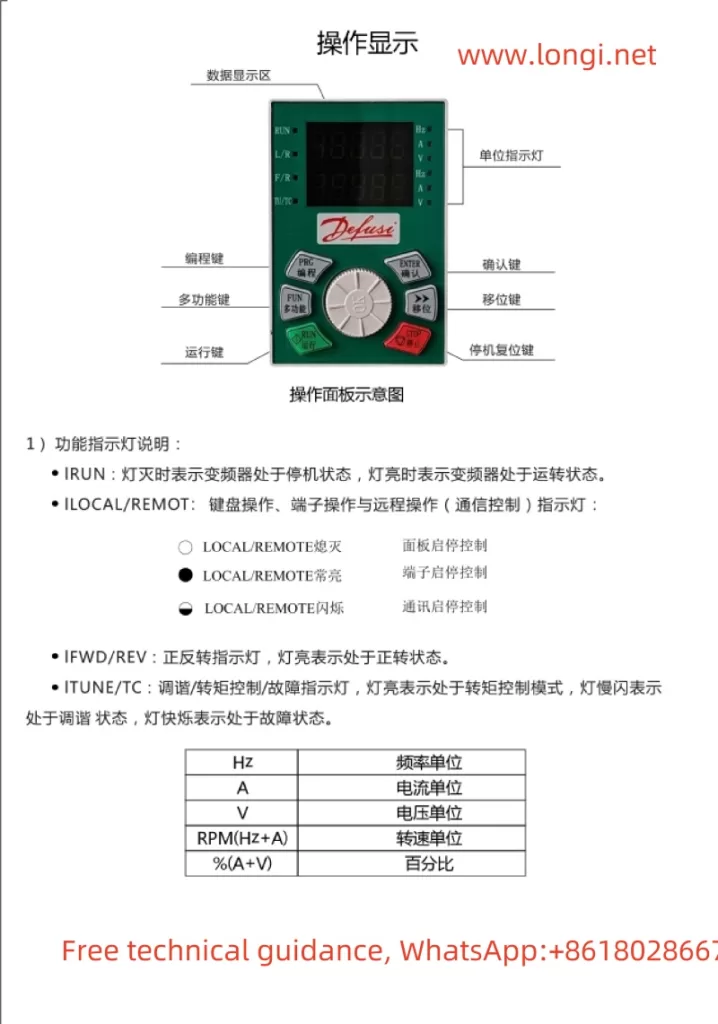
The VAIDNOR VDF750 series inverter is equipped with an intuitive and user-friendly LED operation panel for function code operation, status monitoring, and control. The main functions of the operation panel include:
- RUN Indicator: Indicates whether the inverter is currently running.
- LO/RE (Run Command) Indicator: Indicates the current run control source (panel, terminal, or communication).
- FWD/REV (Forward/Reverse) Indicator: Indicates the current rotation direction of the motor.
- TUNE/TC (Tuning/Torque Control/Fault) Indicator: Indicates the current torque control mode or fault status.
Through function keys on the operation panel such as the Programming Key (PRG), Enter Key (ENT), Increment Key (+), and Decrement Key (-), users can conveniently modify parameters, monitor status, and control the inverter.
1.2 Parameter Initialization
Initializing parameters can restore the inverter settings to the factory defaults. The specific operation steps are as follows:
- Power On: Ensure the inverter is correctly wired and powered on.
- Enter Parameter Setting Interface: Press the PRG key to enter programming mode, and use the Increment or Decrement keys to select the PP group parameters.
- Set Parameter Initialization: Set PP-01 to 1 and press the ENT key to confirm. At this point, the inverter’s parameters will be restored to the factory settings (excluding motor parameters).
1.3 Self-Learning Operation
The self-learning operation allows the inverter to automatically acquire the electrical parameters of the controlled motor to improve control accuracy. The specific operation steps are as follows:
- Motor Load Disconnection: If possible, disconnect the motor from the load to ensure that the motor can rotate freely without load.
- Select Self-Learning Mode: Set P1-37 to 2 (asynchronous motor dynamic complete tuning) or 3 (asynchronous motor static complete tuning) and press the ENT key to confirm.
- Start Self-Learning: Press the RUN key on the operation panel, and the inverter will automatically drive the motor to perform the tuning operation, stopping automatically upon completion.
1.4 Setting and Eliminating Passwords
To protect parameters from being modified casually, a user password can be set.
- Setting Password: Set PP-00 to a non-zero value (1-65535) and press the ENT key to confirm.
- Eliminating Password: Reset PP-00 to 0 and press the ENT key to confirm, which will eliminate the password.
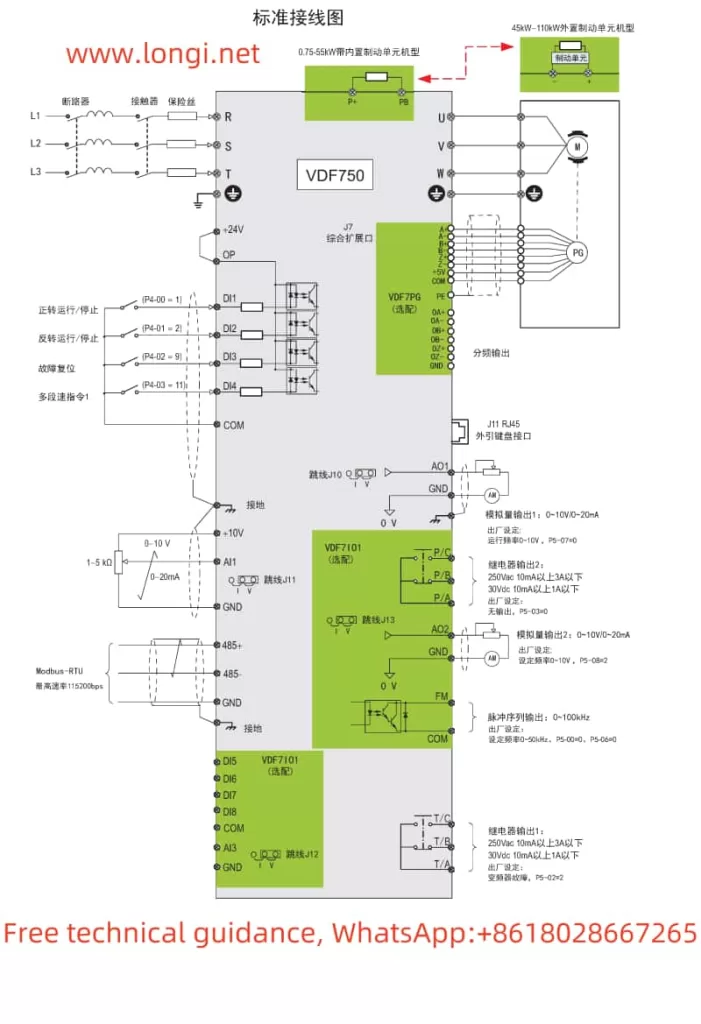
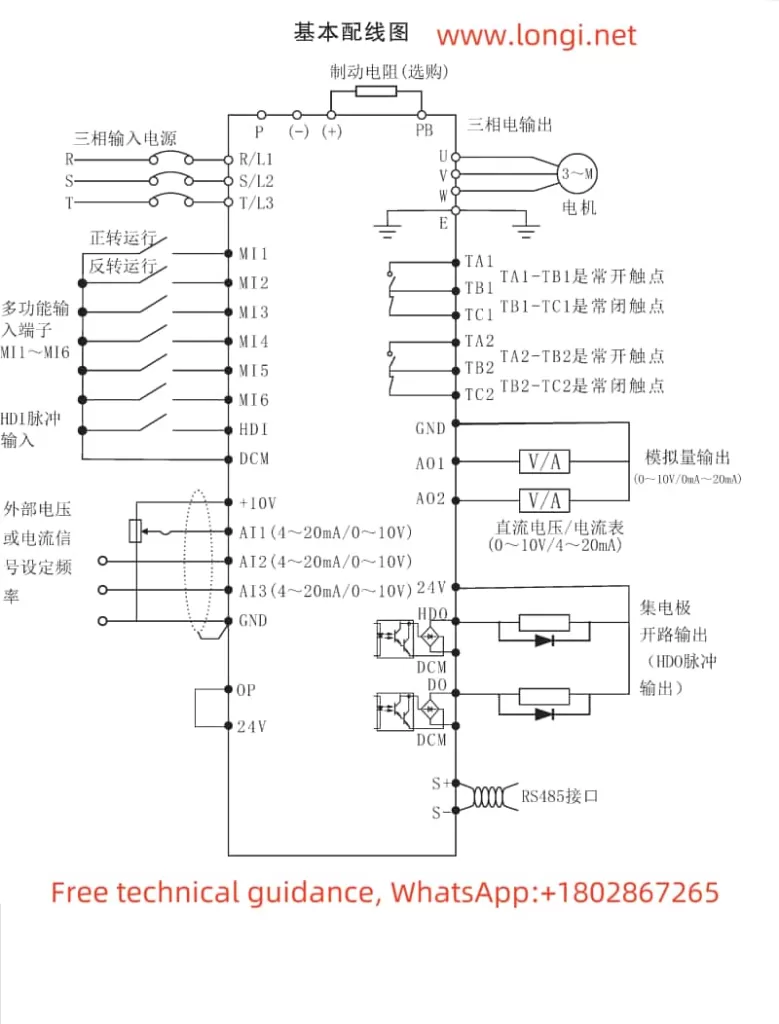
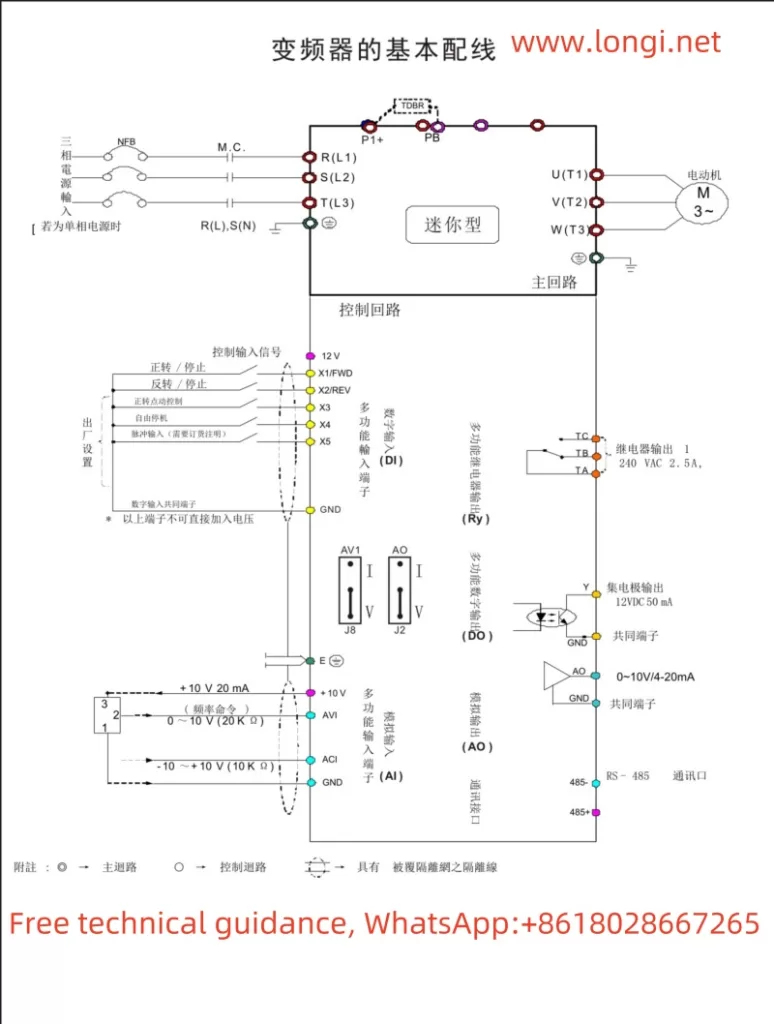
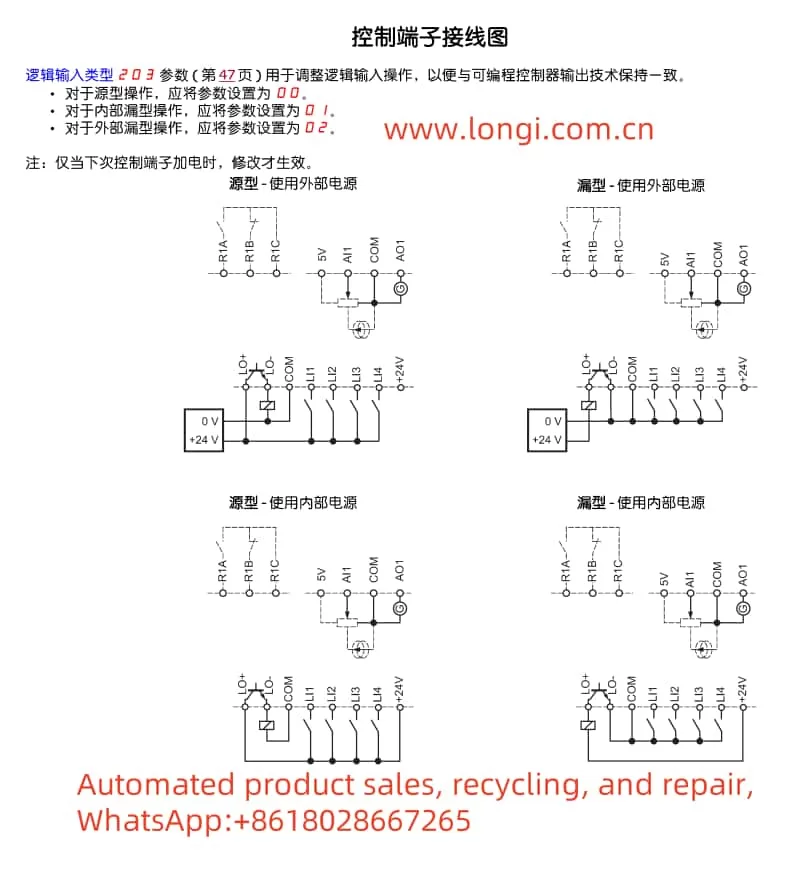
II. Forward/Reverse Start/Stop and External Potentiometer Speed Adjustment Settings
2.1 Wiring Instructions
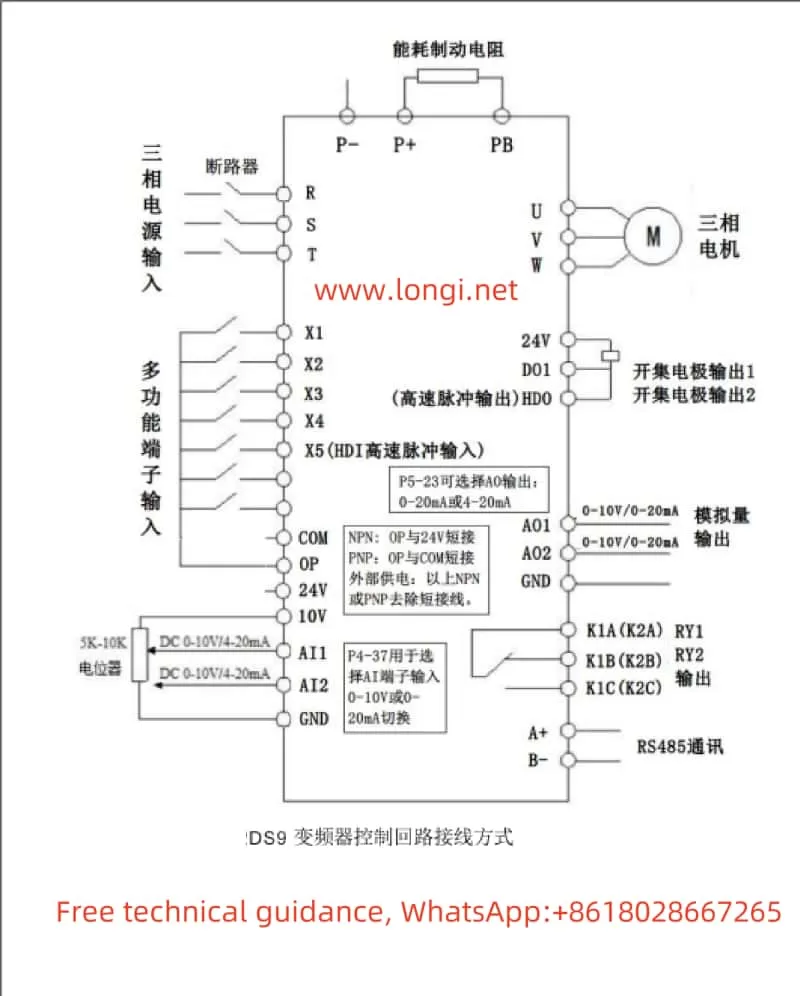
To achieve forward/reverse start/stop and external potentiometer speed adjustment, it is necessary to correctly wire the control terminals of the inverter. The specific wiring is as follows:
- Forward Start: Connect the external forward button or relay contact to the DI1 terminal (positive) and the COM terminal (negative).
- Reverse Start: Connect the external reverse button or relay contact to the DI2 terminal (positive) and the COM terminal (negative).
- Stop: Connect the external stop button or relay contact to the DI3 terminal (positive) and the COM terminal (negative).
- External Potentiometer Speed Adjustment: Connect the center tap of the external potentiometer to the AI1 terminal, one end to the +10V terminal, and the other end to the GND terminal.
2.2 Parameter Settings
- Run Command Selection: Set P0-02 to 1 (terminal control).
- DI Terminal Function Settings:
- Set P4-00 to 1 (DI1 for forward operation).
- Set P4-01 to 2 (DI2 for reverse operation).
- Set P4-02 to 9 (DI3 for fault reset).
- AI Terminal Function Settings:
- Set P0-03 to 2 (AI1 analog input).
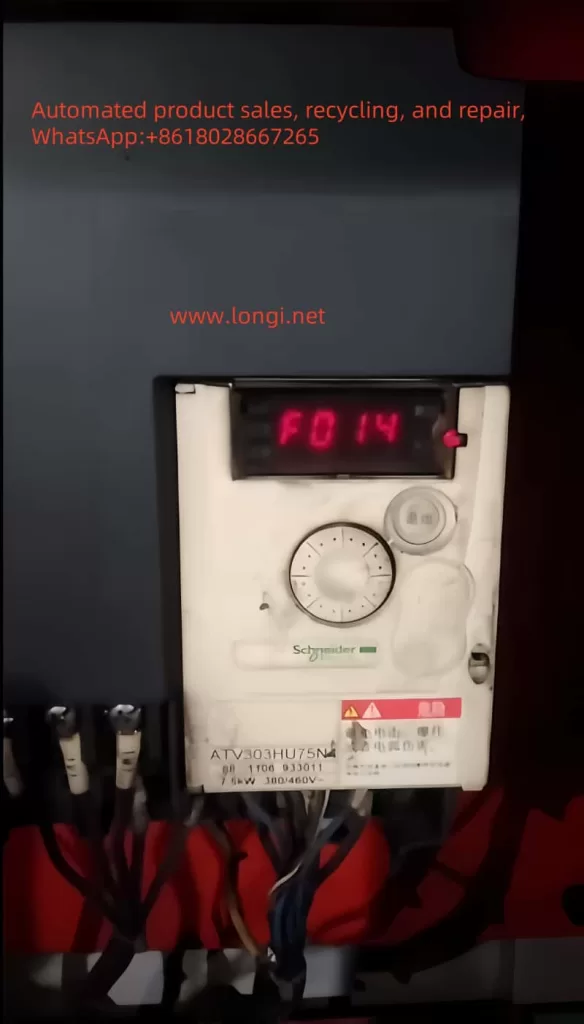
III. Fault Code Analysis and Solutions
3.1 Fault Code Analysis
The VAIDNOR VDF750 series inverter has comprehensive fault diagnosis functions. When a fault occurs, the inverter will display the corresponding fault code. The following are some common fault codes and their possible causes:
- Err02: Acceleration overcurrent. Possible causes include output circuit short circuit, motor stall, or improper parameter settings.
- Err03: Deceleration overcurrent. Possible causes include damaged braking resistors, too short deceleration time, or excessive load inertia.
- Err04: Constant speed overcurrent. Possible causes include motor overload, improper parameter settings, or external interference.
- Err05: Acceleration overvoltage. Possible causes include excessive input voltage, improper deceleration time settings, or lack of braking resistors.
3.2 Solutions
- Check Peripheral Circuits: Confirm that the motor and cables are correctly connected and there are no short circuits or open circuits.
- Adjust Parameters: Adjust parameters such as acceleration/deceleration time and braking resistors based on the load conditions.
- Check Braking Resistors: Ensure that the braking resistors are correctly connected and not damaged.
- External Environment Check: Eliminate external interference sources such as electromagnetic interference.
IV. Conclusion
The VAIDNOR VDF750 series inverter user manual provides detailed operation guides and parameter setting methods. By correctly understanding and applying the knowledge in the manual, users can easily perform functions such as inverter initialization, self-learning operation, password setting and elimination, forward/reverse start/stop, and external potentiometer speed adjustment. Additionally, the manual provides comprehensive fault code analysis and solutions to help users quickly locate and resolve issues, ensuring stable operation of the inverter.