
I. High-Voltage Inverter Principles
The Senlan SBH series of high-voltage inverters utilize advanced multi-level unit series technology, which combines multiple low-voltage power units in series to achieve direct high-voltage input to high-voltage output conversion. Its core principles encompass several crucial components:
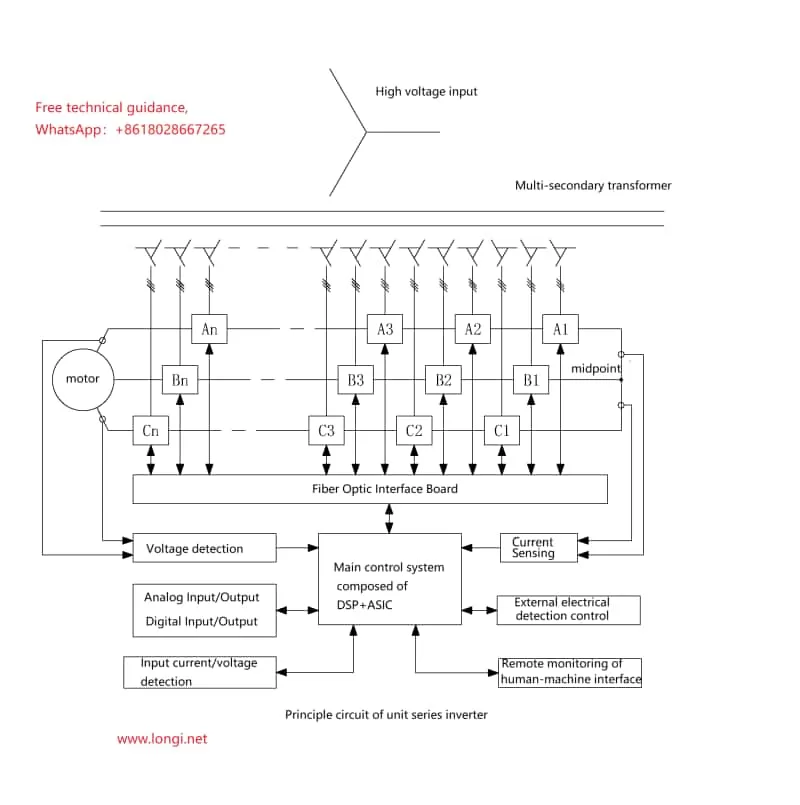
- Phase-Shift Transformer: Employing a multi-secondary phase-shift design, this transformer converts grid high voltage into multiple low-voltage outputs for the power units. The phase-shift technology effectively reduces harmonic currents on the grid side, enhancing power quality.
- Power Units: Each power unit functions as an independent PWM inverter, capable of outputting voltage waveforms of specific amplitude and frequency. When multiple power units are connected in series, they form a high-voltage output, enabling precise control over high-voltage motors.
- Fiber-Optic Communication: High-speed and reliable communication between power units and the control cabinet is facilitated through fiber-optic cables, transmitting control signals and status information to ensure rapid system response and stability.
- Main Control System: Located within the control cabinet, this system oversees the logical control and computational processing of the entire inverter system. By receiving external commands and internal feedback signals, it precisely regulates the power units.
II. Usage Method
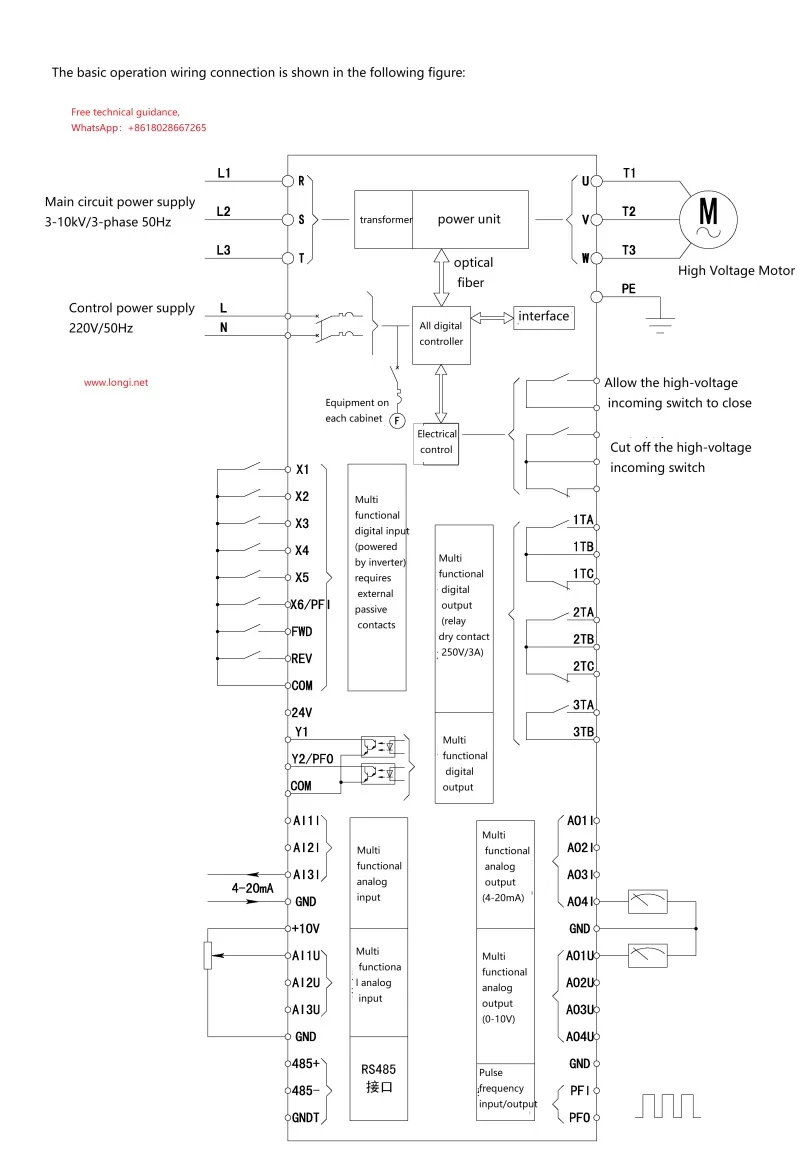
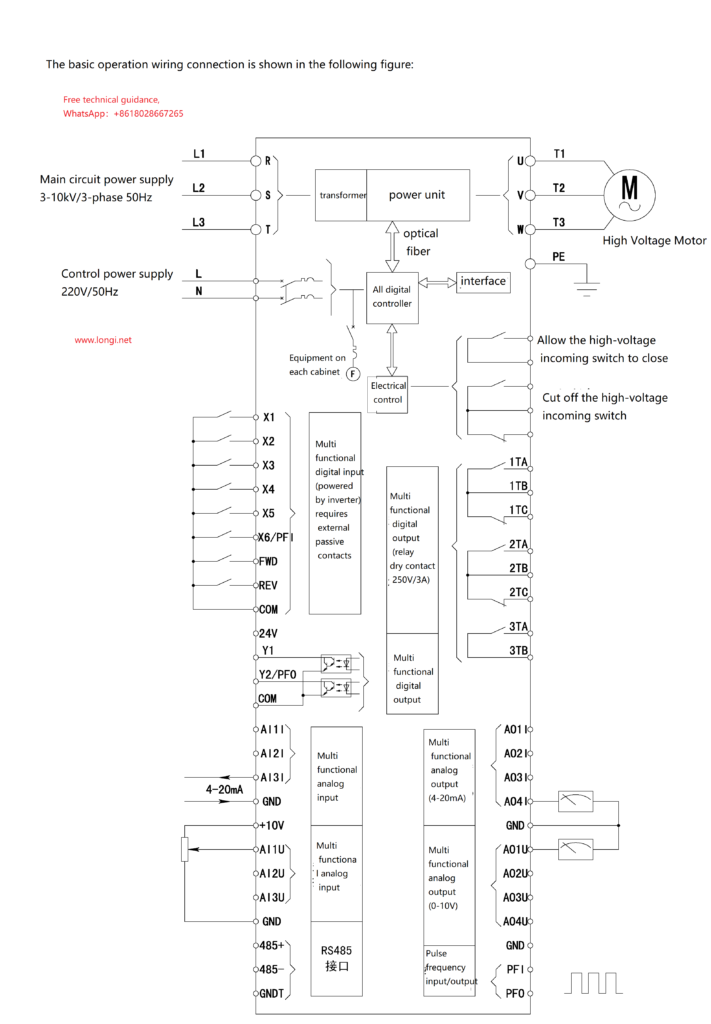
- Installation and Wiring:
- Install the inverter in a dry, well-ventilated, dust-free environment, keeping it away from flammable and explosive materials.
- Follow the manual’s guidelines for wiring the main and control circuits, ensuring accurate and secure connections, with special attention paid to high-voltage isolation.
- Parameter Setting:
- Utilize the human-machine interface (HMI) to configure the inverter’s various parameters, including motor settings, control modes, and protection configurations.
- Adjust acceleration/deceleration times, V/F curves, and other parameters according to specific operating conditions to meet requirements.
- Startup and Commissioning:
- Under safe conditions, follow the manual’s steps to initiate a no-load test of the inverter.
- Observe the inverter’s operational status and motor response, gradually fine-tuning parameters to achieve optimal performance.
III. Precautions
- Safety Considerations:
- Throughout installation, commissioning, and maintenance, ensure power is disconnected and warning signs are displayed to prevent electrocution.
- Strictly prohibit opening cabinet doors or touching live high-voltage components while the inverter is operational.
- Operators must undergo professional training, familiarizing themselves with operational procedures and safety precautions.
- Environmental Requirements:
- Verify the inverter’s installation environment complies with manual specifications, preventing damage from excessive temperature, humidity, or corrosive gases.
- Regularly inspect and clean the inverter’s surroundings, ensuring proper ventilation.
- Periodic Inspections:
- Routinely check the inverter’s terminal blocks, capacitors, resistors, and other components for damage, promptly replacing worn parts.
- Keep an eye out for abnormal vibrations, noises, or odors emanating from the inverter, addressing any issues promptly.
IV. Maintenance Precautions
- Routine Maintenance:
- Regularly verify the inverter’s operating environment, monitoring factors such as temperature and humidity.
- Promptly attend to any unusual vibrations, sounds, or odors, investigating and resolving any issues encountered.
- Schedule regular cleaning of fan filters and heat sinks to maintain optimal cooling performance.
- Scheduled Servicing:
- Conduct a comprehensive inspection and maintenance service every 3 to 6 months.
- Securely tighten terminal blocks, swap out aging capacitors and resistors, and clean circuit boards and air ducts to prevent dust accumulation.
- Professional Repairs:
- For complex faults or specialized maintenance needs, promptly contact Senlan’s after-sales service team or qualified technicians. Avoid attempting unauthorized disassembly or repairs, which could exacerbate issues or pose safety hazards.