Introduction
The Mettler Toledo IND131/IND331 Series Weighing Controller Manual serves as an essential reference for users to understand, install, operate, and maintain this series of weighing controllers. This article aims to provide a detailed user guide, assisting users in better comprehending and utilizing this controller.

Controller Keypad and Display Functionality
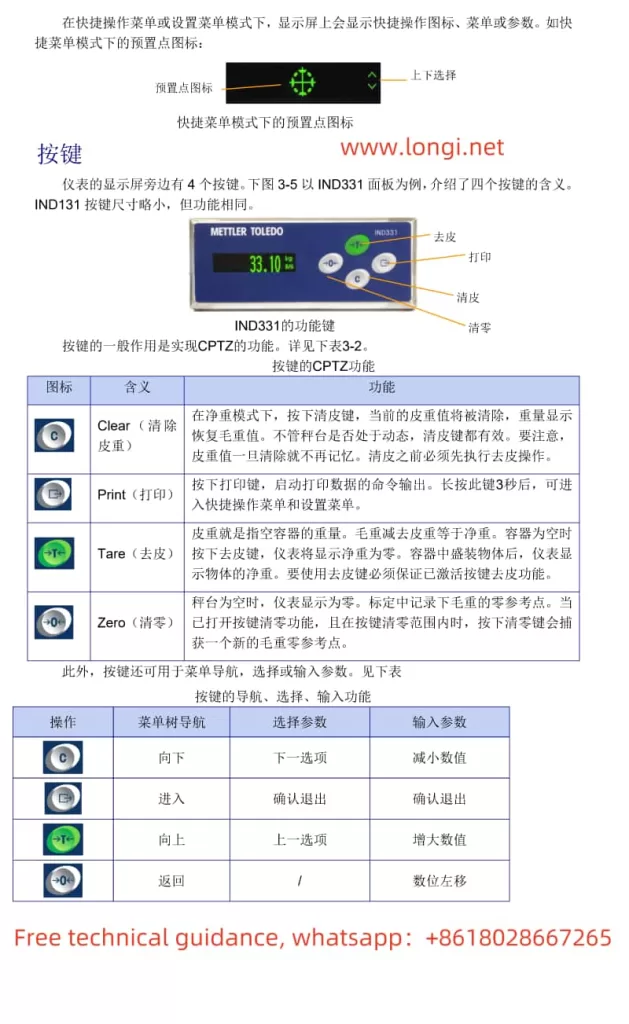
The IND131/IND331 series of weighing controllers are equipped with four primary keys: C (Clear Tare), P (Print), T (Tare), and Z (Zero). The display is a green OLED dot matrix screen used to show weight, units, gross/net weight status, and other information.
- C Key (Clear Tare): In net weight mode, pressing this key clears the current tare value, restoring the gross weight display.
- P Key (Print): Pressing this key initiates print data output. Pressing and holding for 3 seconds enters the quick operation menu and settings menu.
- T Key (Tare): Used to set or clear the tare weight, enabling the instrument to display zero net weight when the container is empty.
- Z Key (Zero): When the scale platform is empty, pressing this key performs zero calibration.
The display shows the current weight, units, gross/net weight status, and supports multiple languages such as Chinese and English.
Preset Point and Comparator Function Settings
Preset Point Function Settings
The preset point function is used for fixed value control, such as dual-speed filling of single materials. The setup steps are as follows:
- Enter the “Preset Point Setup” (F2.1) in the settings menu and select the tolerance type (absolute value or percentage).
- In the “Preset Point” (F2.2) menu, set the preset point value, negative tolerance, positive tolerance, spillage, and fine feed value.
- Configure the Discrete I/O menu (F2.4) to set the preset point-related input and output points.
Comparator Function Settings
The comparator function is used for material alarm, checkweighing, and sorting. The setup steps are as follows:
- Enter the “Comparator” (F2.3) in the settings menu and select Comparator 1, 2, or 3.
- Set the data source (displayed weight, gross weight, rate, etc.), comparison conditions (e.g., less than, equal to, greater than), and upper and lower limits.
- Configure the Discrete I/O menu (F2.4) to set the comparator-related input and output points.
Scale Calibration Settings and Operations
The IND131/IND331 series controllers offer three calibration methods: zero and full-scale calibration, step-by-step substitution calibration, and calibration-free.
Zero and Full-Scale Calibration
- Enter the “Calibration” (F1.3) in the settings menu and enable or disable linear calibration.
- Execute “Set Zero” (F1.3.2), keep the scale empty, and press the print key to perform zero calibration.
- Execute “Set Span” (F1.3.3), input the test weight, place the weight, and press the print key to perform span calibration.
Step-by-Step Substitution Calibration
- Enter the “Step Cal” (F1.3.4) menu, input the test weight.
- Follow the prompts for zero calibration, place the test weight, and perform step-by-step calibration.
- Repeat the steps until the weight on the container reaches the full scale of the scale.
Calibration-Free
- Enter the “CalFREE” (F1.3.5) menu, input the total sensor capacity and rated output sensitivity.
- Confirm to execute the calibration-free process and wait for the calibration success or failure prompt.

Electrical Connections and Data Backup, Recovery, and Upgrade
Electrical Connections
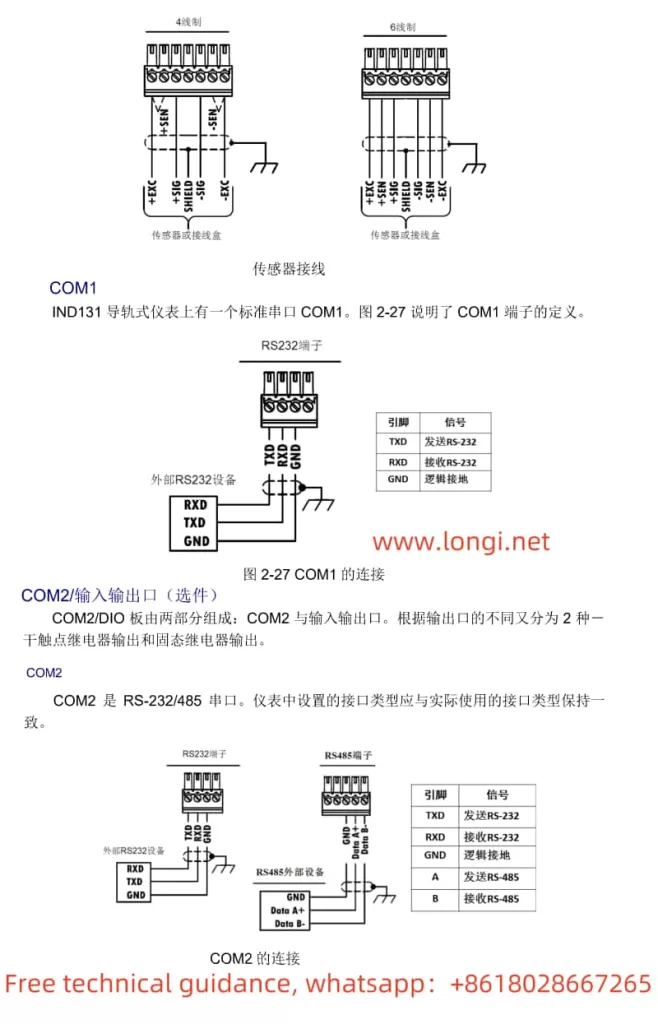
- Sensor Wiring: Short-circuit +Exc and +Sen, -Exc and -Sen of the sensor, and connect to the sensor/junction box terminals of the controller.
- Communication Line Wiring: The standard serial port COM1 provides an RS-232 interface, and the optional serial port COM2 provides RS-232 or RS-485 interfaces, wired according to requirements.
- 4-20mA Analog Output Wiring: Connect the analog output signal to the corresponding terminal based on the version of the option board.
Data Backup, Recovery, and Upgrade
- Data Backup: Insert the SD memory card and follow the prompts to save the configuration file.
- Data Recovery: Insert the SD memory card, select to restore the configuration file, and confirm whether to include calibration data.
- Software Upgrade: Insert the SD memory card containing the upgrade software, enter the maintenance menu, and follow the prompts to perform the software upgrade.
Error Code Meaning Analysis and Solutions
Err0015 Error Code
The Err0015 error code indicates “No Seal”. The solution is as follows:
- Check the approval settings (F1.1.2) of the instrument to ensure the seal status is not selected.
- If you need to cancel the seal status, switch SWITCH-1 to the OFF position or set the approval to “None”.
Conclusion
The Mettler Toledo IND131/IND331 Series Weighing Controller Manual provides a detailed user guide, including keypad and display functionality, preset point and comparator function settings, scale calibration methods, electrical connections, data backup, recovery, and upgrade. This guide helps users better understand and operate this weighing controller, improving production efficiency and accuracy. In practical applications, users should strictly follow the manual instructions to ensure the normal operation and long-term stability of the equipment.
