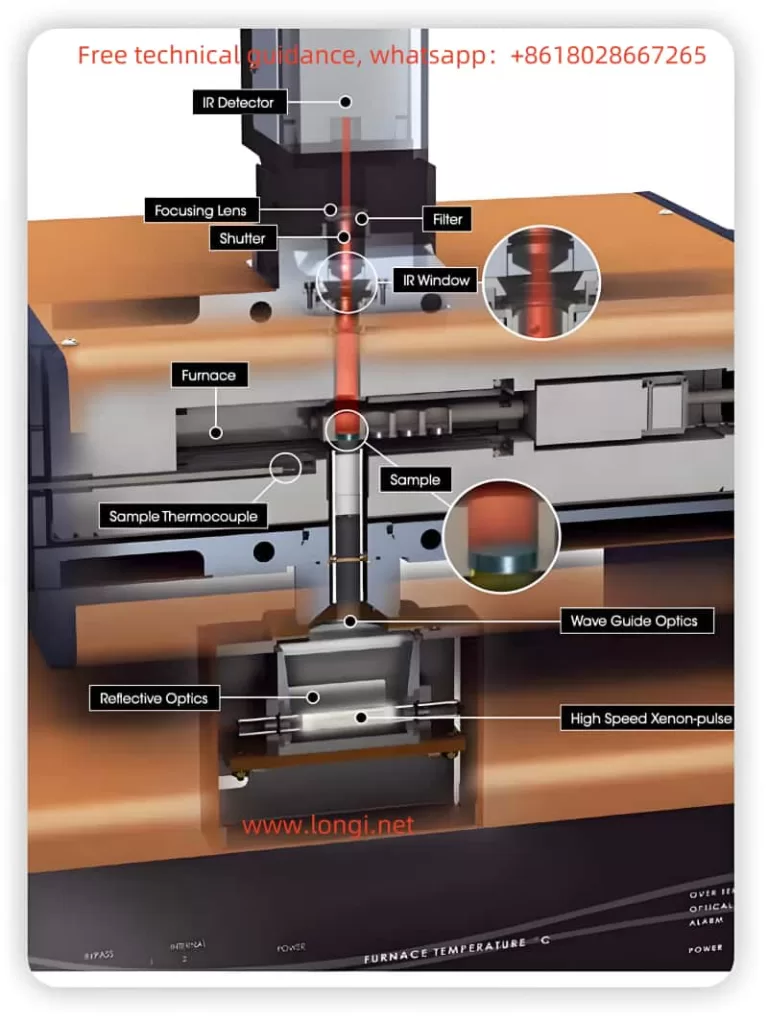
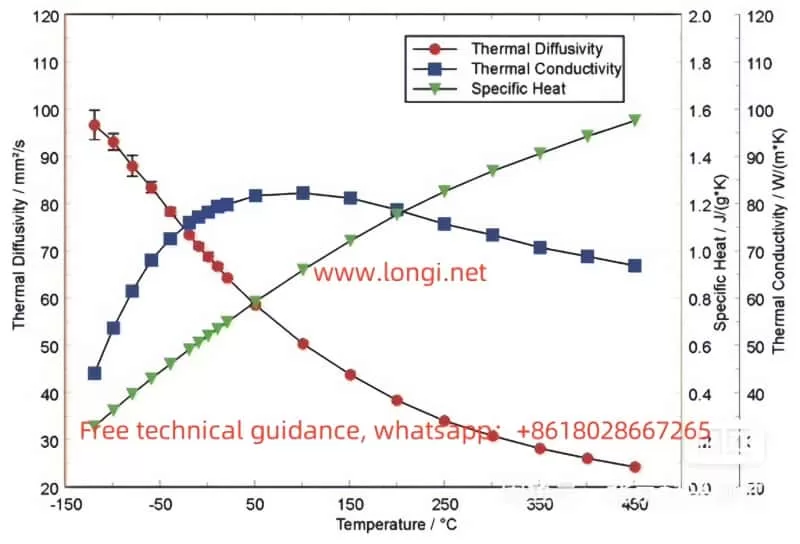
The TA Pulse Laser Thermal Conductivity Tester DLF-1 is a high-precision thermal property testing instrument, widely used in materials science, electronic engineering, metallurgy, chemistry, and other fields. Based on the principle of laser pulse thermal conductivity testing technology, it measures the thermal diffusion characteristics of materials under laser irradiation to evaluate thermal conductivity and other thermal properties. This article provides a detailed user guide to help users better understand the operation, precautions, and troubleshooting methods of this device.

1. Device Overview
The TA Pulse Laser Thermal Conductivity Tester DLF-1 uses high-precision laser pulse heating technology to accurately measure the thermal diffusion time of materials, thereby calculating thermal conductivity, thermal diffusivity, and other physical parameters. The device is compact and easy to operate, suitable for various materials, including metals, ceramics, composites, and liquids.
Key technical specifications include:
- Laser pulse energy: up to several millijoules
- Measurement range: thermal conductivity of materials from room temperature to high temperature
- Data acquisition accuracy: up to 0.1%
- Measurement time: typically from milliseconds to a few seconds
2. Pre-Operation Preparation
Before using the TA Pulse Laser Thermal Conductivity Tester DLF-1, users should ensure the following:
- Check the Device Appearance
Confirm that the external appearance of the device is undamaged and that the laser and detector components are in good condition. - Power Connection
Ensure the device is connected to a stable power source, and the voltage meets the device’s requirements. Use the supplied power cable and avoid replacing it with an unauthorized one. - Install the Sample
According to the sample installation guidelines in the user manual, ensure the sample is placed on the test platform and secured properly. The sample’s surface should be flat and smooth to ensure uniform laser irradiation. - Calibration
It is recommended to calibrate the device before the first use or after it has been idle for an extended period. Follow the calibration procedure in the user manual to ensure accurate test results.

3. Operating Procedure
- Power On and Initialization
Turn on the device. The device will perform a self-check and automatically start the operating interface. Once the self-check is completed, the main interface will appear. - Select Test Mode
Depending on the sample type (e.g., solid, liquid, or gas), select the appropriate test mode. Different materials may require different laser pulse intensity and detector sensitivity. - Set Test Parameters
Set the test parameters based on the sample’s properties, including laser pulse energy, test duration, scanning rate, etc. The system provides automatically recommended parameter settings, but users can manually adjust them according to specific requirements. - Start the Test
Click the “Start Test” button. The laser pulse will irradiate the sample surface, and the device will record the temperature changes during the thermal diffusion process, calculating thermal conductivity and other thermal properties. - View and Save Data
After the test is completed, the system will automatically generate a test report. Users can view the results and choose to save the data. It is recommended to regularly save the test data for future analysis and comparison.
4. Precautions and Usage Details
- Laser Safety
Laser pulses have a certain amount of radiation energy. When operating the device, users should wear appropriate laser protective glasses and avoid direct exposure to the laser beam. - Environmental Control
Temperature and humidity fluctuations in the test environment can affect the results. Keep the testing environment temperature stable and avoid strong air currents and temperature variations. - Sample Preparation
The surface condition of the sample has a significant impact on the results. Ensure the sample surface is free of oil, dust, or any substances that could affect the light irradiation. For highly reflective materials, use a light-absorbing agent to enhance absorption. - Operator Training
Users should receive training on operating the device before use, understanding its basic functions and operation methods to avoid incorrect operation leading to errors or device damage.
5. Maintenance and Care
To ensure the long-term stable operation of the TA Pulse Laser Thermal Conductivity Tester DLF-1, users should perform regular maintenance and care:
- Regular Cleaning
Clean the exterior and optical components of the device with a soft, lint-free cloth. Avoid using chemical cleaners to prevent damaging the surface and optical elements. - Check the Laser System
The laser emitter is one of the core components of the device. Periodically check the laser output power to ensure it is in normal working condition. If the laser output is abnormal, contact the manufacturer for inspection and repair. - Maintain the Cooling System
Ensure that the cooling system of the device is functioning properly. For long-term use, check whether the cooling fluid needs to be replaced to ensure stable system temperatures. - Software Updates
Periodically check and update the device’s operating software to ensure the latest version is in use, improving functionality and performance.
6. Troubleshooting and Handling
During operation, users may encounter some common faults. Below are some common issues and troubleshooting methods:
- Device Does Not Start
- Check the power connection to ensure it is stable and the power plug and cable are intact.
- Check if the fuse has blown and replace it if necessary.
- Test Data Is Inaccurate
- Check if the laser pulse energy is suitable for the current sample.
- Ensure the sample surface is clean and recalibrate the device.
- Check if the temperature sensor is working properly.
- Laser Output Abnormal
- Check if the laser emitter is obstructed or damaged.
- Contact the manufacturer for inspection and replacement of the laser module.
By following the above steps, users can better understand the operation process of the TA Pulse Laser Thermal Conductivity Tester DLF-1 and effectively handle common faults. Regular maintenance and attention to usage details will help extend the device’s lifespan and ensure the accuracy and reliability of test results.
