
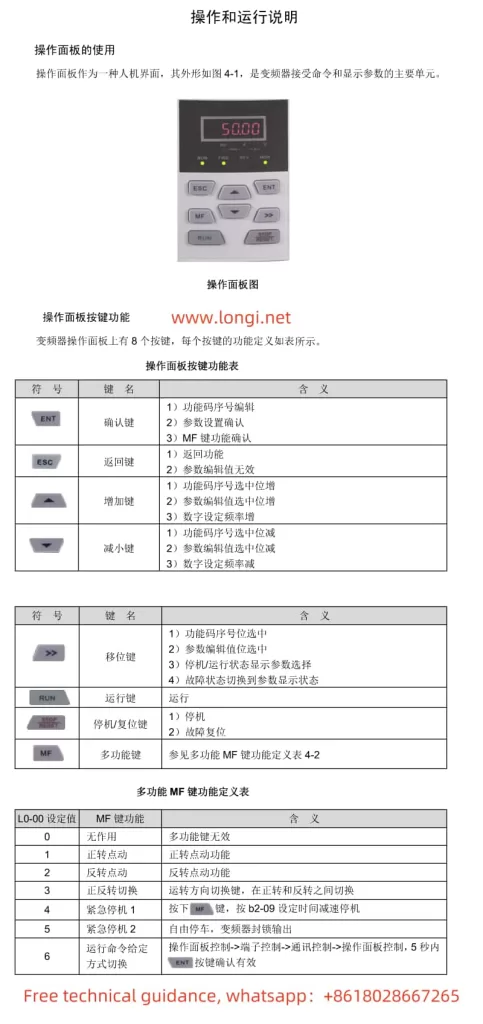
Introduction to the Functions of the INVERTER Operation Panel
The operation panel of JiTaike’s GK820 INVERTER serves as the primary interface for user interaction, providing a range of functions and settings. The operation panel includes a display screen and various buttons such as the Confirm key, Increase key, Decrease key, Run key, and Stop/Reset key.
How to Initialize Parameters
Parameter initialization restores all the function codes of the INVERTER to their factory default values. The operation steps are as follows:
- In the stopped state, press the Confirm key to display the current function code A0-00.
- Press the key to switch to the A0-03 function code.
- Press the key to select “2” or “3”, where “2” restores all parameters except motor parameters, and “3” restores all parameters (including motor parameters).
- Press the key to save the setting and automatically return to the A0-00 function code.
- Press the key to exit the function code sequence editing state.
How to Set and Cancel a Password
Password setting protects the INVERTER parameters from being changed arbitrarily. The operation steps are as follows:
- In the stopped state, press the Confirm key to display the current function code A0-00.
- Press the key to switch to the A0-00 function code and press the key to display the parameter value 0000.
- Press the key to modify the parameter value, for example, setting it to 1006.
- Press the key to save and automatically display the next function code.
- Repeat steps 2 to 4, setting the A0-00 parameter value to 1006 again.
- Simultaneously press the Increase key and Decrease key for 5 minutes, or restart the INVERTER, and the password will be activated.
The method for canceling the password is similar. Simply write the A0-00 parameter value as 0000 twice consecutively after the password is successfully set.
Terminal Start/Stop and External Potentiometer Speed Regulation Settings
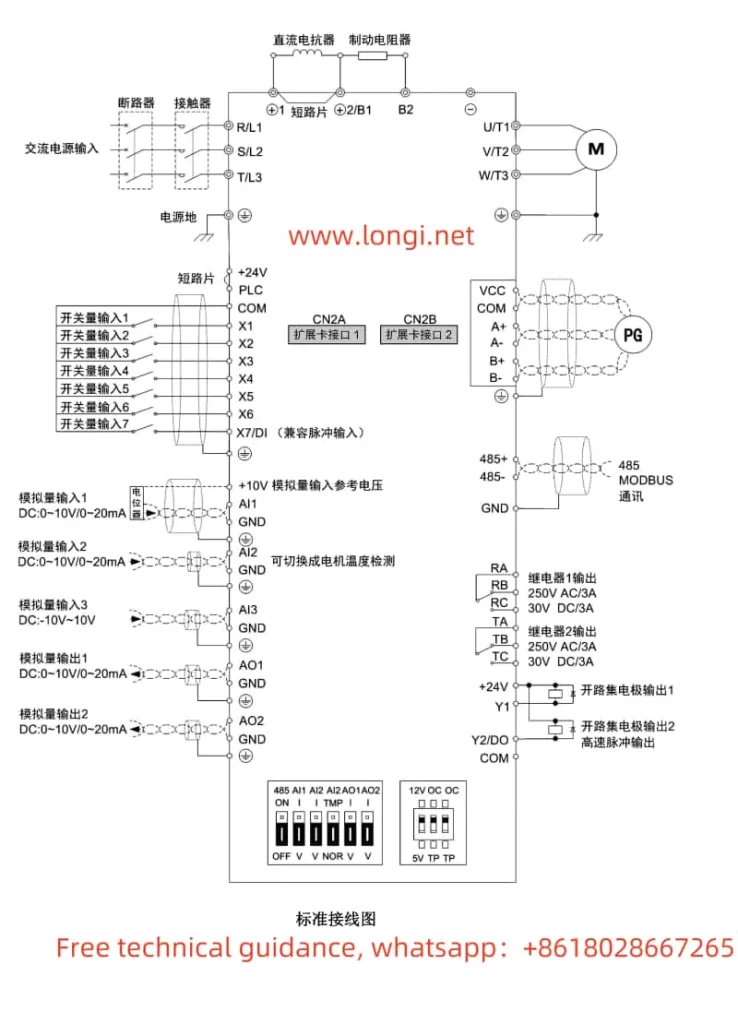
Wiring Instructions
To achieve terminal start/stop and external potentiometer speed regulation, proper wiring and parameter settings are required. The specific wiring steps are as follows:
- Start/Stop Terminal Wiring: Connect the start terminal (e.g., FWD) to the X1 terminal of the INVERTER, and the stop terminal (e.g., REV) to the X2 terminal of the INVERTER.
- External Potentiometer Wiring: Connect the output terminal of the potentiometer to the AI1 or AI2 terminal of the INVERTER. Select voltage input or current input based on the potentiometer type and set it via the jumper switch S2 or S3.
Parameter Settings
- Run Command Given Method Settings:
- Enter the function code b1-00 and set it to “1” for terminal control.
- Enter the function code b1-02 and select forward or reverse rotation as needed.
- Frequency Given Method Settings:
- Enter the function code b0-00 and set it to “3” for analog input AI1 or AI2.
- Enter the function code b0-01 and set it to the corresponding analog input channel, such as “3” for AI1.
- Other Related Parameters:
- Set parameters such as acceleration time (b2-01) and deceleration time (b2-02) as needed.
Meaning and Solutions of INVERTER Fault Codes
Common Fault Codes and Their Meanings
- oC1/oC2/oC3: Overcurrent fault, indicating that the output current of the INVERTER exceeds the rated value.
- ov1/ov2/ov3: Overvoltage fault, indicating that the DC bus voltage of the INVERTER is too high.
- oL1: INVERTER overload, indicating that the output current of the INVERTER exceeds the rated value for an extended period.
- oL2: Motor overload, indicating that the motor current exceeds the set value.
- FAL: Module protection, indicating a fault in the power module inside the INVERTER.
- ISF: Input power supply abnormality, indicating that the input power supply voltage or frequency is abnormal.
Solutions
- Overcurrent Fault (oC Series):
- Check if the motor is locked or the load is too heavy.
- Check the wiring between the motor and the INVERTER for good connection.
- Appropriately increase the acceleration time and deceleration time.
- Overvoltage Fault (ov Series):
- Check if the input power supply voltage is too high.
- Check if the braking unit and braking resistor are working properly.
- Overload Fault (oL Series):
- Check if the load is too heavy or if the motor is damaged.
- Appropriately increase the overload protection time or reduce the overload protection level.
- Module Protection (FAL):
- Check for foreign objects or damage inside the INVERTER.
- Contact the manufacturer or a professional technician for repair.
- Input Power Supply Abnormality (ISF):
- Check if the input power supply voltage and frequency meet the requirements.
- Check if the power cord and wiring terminals are loose or poorly connected.
By following these steps, users can better operate and maintain JiTaike’s GK820 INVERTER, ensuring its normal operation and extending its service life.