
This comprehensive guide covers the key features and essential operations of the POWTRAN PI500 Series high-performance current vector inverter, including parameter adjustment via the panel, start/stop control through terminals, external potentiometer debugging mode configuration, and multi-speed settings.
1. Adjusting Parameters via the Inverter Panel
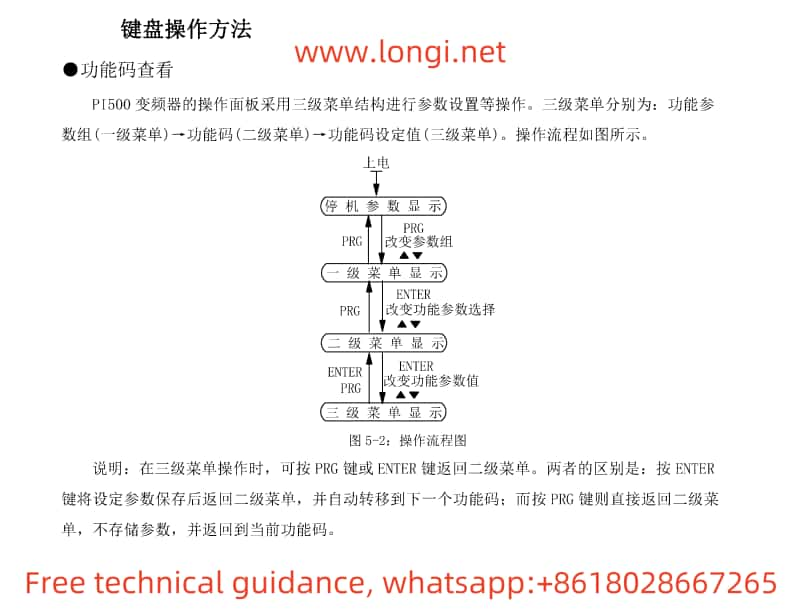
To adjust parameters using the inverter’s keypad, follow these steps:
- Enter Menu: Press the
PRGkey to enter the parameter setting mode. - Select Parameter Group: Use the arrow keys to select the desired function parameter group (e.g., F0 group for basic function parameters).
- Select Function Code: Within the selected group, use the arrow keys to choose the function code you wish to modify.
- Adjust Parameter Value: Use the increment/decrement keys to adjust the parameter value or enter a new value directly with the numeric keys.
- Save Settings: After making changes, press
ENTERto confirm and save your settings.
Note: Some parameters cannot be modified during operation and require the inverter to be stopped first. Always consult the manual thoroughly before adjusting parameters.
2. Starting and Stopping the Inverter via Terminals
To control the inverter’s start and stop via external terminals, follow these configuration steps:
- Set Command Source: Set F0.11 (Command Source Selection) to “1” (Terminal Control) to enable external terminal operation.
- Assign Terminal Functions: Use F1 group function codes (e.g., F1.00, F1.01) to assign specific input terminals (e.g., DI1, DI2) for forward, reverse, stop, and other functions.
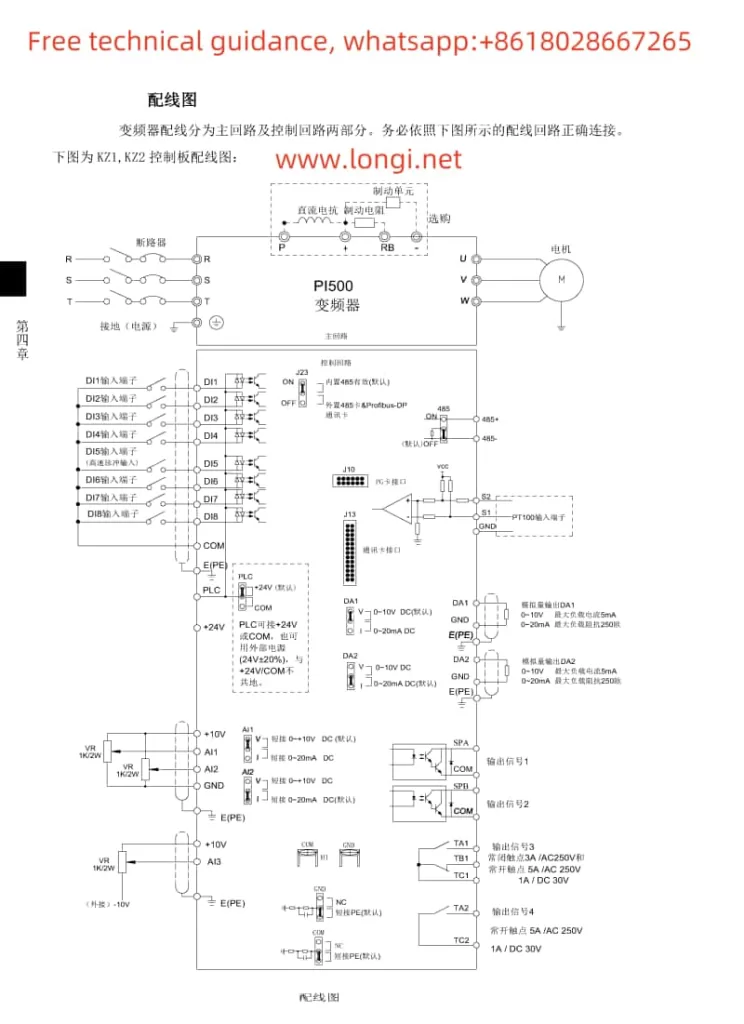
- Wiring: Connect the external control signal wires correctly to the designated input terminals based on your settings.
To start the inverter, apply a closure signal to the forward terminal (e.g., DI1). To stop, apply a stop signal to the stop terminal (which may be DI2, depending on your configuration) or disconnect the forward signal.
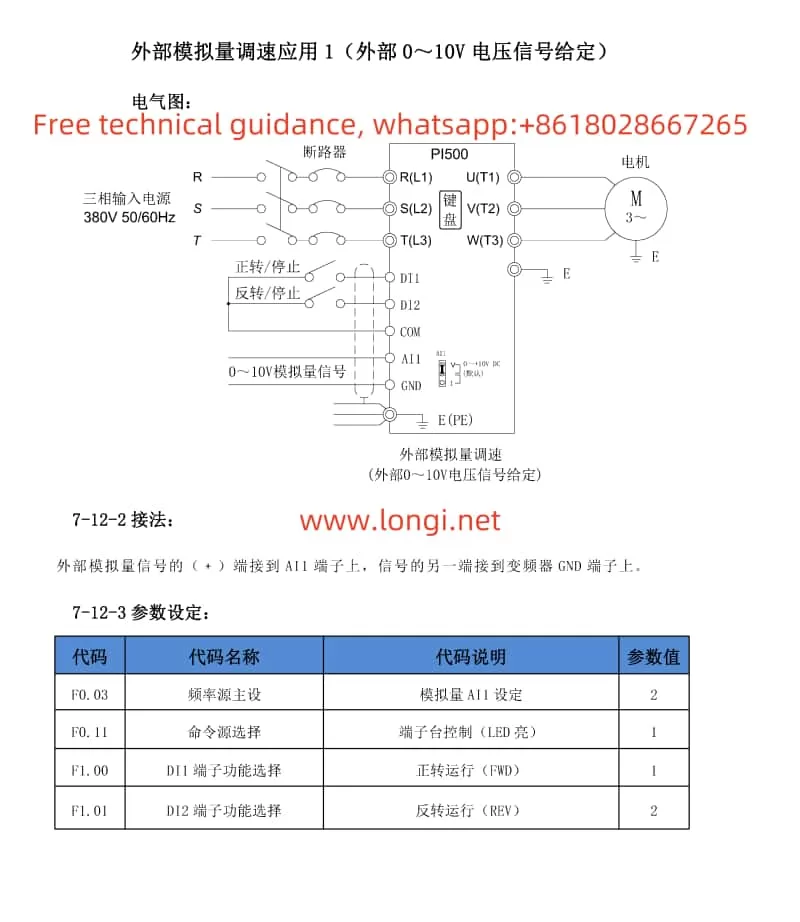
3. Setting External Potentiometer Adjustment Mode
To configure the inverter for external potentiometer adjustment, follow these steps:
- Configure AI1 Input:
- Wiring: Connect the external potentiometer’s output to the inverter’s AI1 and GND terminals.
- Set Input Range: Adjust F1.12 (AIC1 Minimum Input) and F1.14 (AIC1 Maximum Input) based on the potentiometer’s output range to ensure the inverter interprets the signals correctly.
- Select Frequency Source: Set F0.03 (Main Frequency Source Setting) to “2” (Analog AI1 Setting) to use the AI1 input signal as the frequency reference.
- Start Adjustment: Once configured, rotating the external potentiometer will adjust the inverter’s output frequency.
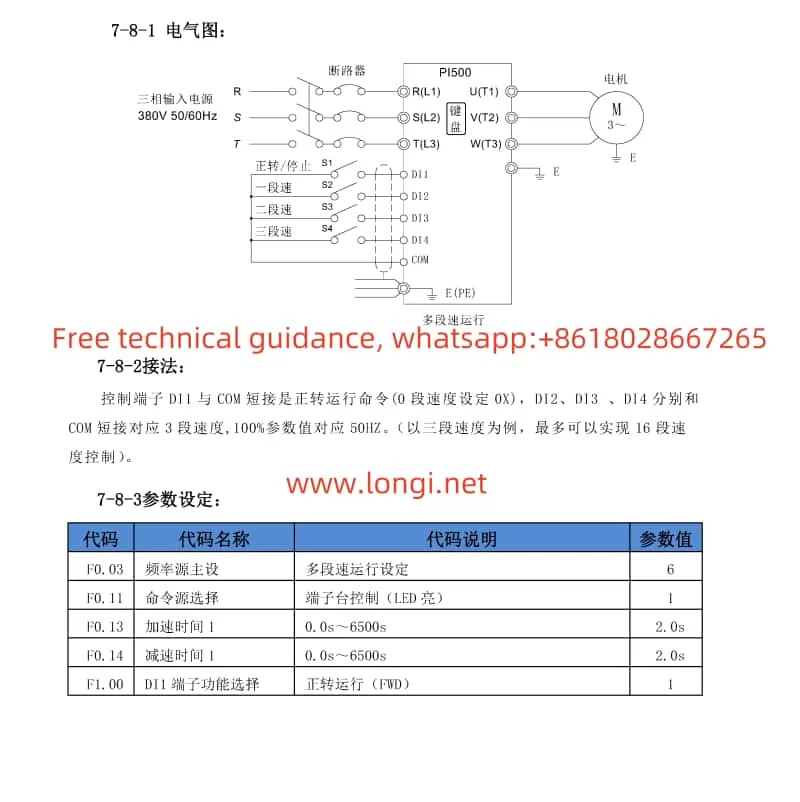
4. Introduction to Multi-speed Functionality
The multi-speed feature enables preset speed profiles, allowing quick switching between them via external signals.
- Preset Speeds: Use E1 group function codes (E1.00 to E1.15) to set up to 16 different speed segments, each representing a percentage of the maximum frequency.
- Assign Terminal Functions: Allocate input terminals (e.g., S1, S2, S3, S4) through F1 group function codes to select between the multi-speed segments based on their combinational states.
- Set Acceleration/Deceleration Times: Customize acceleration and deceleration times for seamless speed transitions using parameters like F0.13 to F0.15.
- Choose Speed Switching Method: Optionally, utilize external signals (high-speed pulses, communication signals) for dynamic speed segment switching.
To utilize the multi-speed feature, manipulate the allocated external terminals or transmit corresponding control signals. The inverter will then adjust its operating frequency according to the activated speed segment.
Notes:
- Ensure speed segment settings align with the motor and inverter’s capabilities.
- Carefully consider the mechanical load’s response to acceleration and deceleration when setting these times.
By following these configurations, you can flexibly manage the inverter’s speed to meet various process demands, while also benefiting from the manual’s detailed guidance for troubleshooting and maintaining optimal performance.
To learn more about the usage of PI500 VFD, you can download its manual from Google Drive or contact our service:https://drive.google.com/file/d/1zCUn1w6h9rEkvbP0yPJ1qAA5–T7axBt/view?usp=sharing