1. Main circuit of “616G3-55kW Yaskawa inverter”
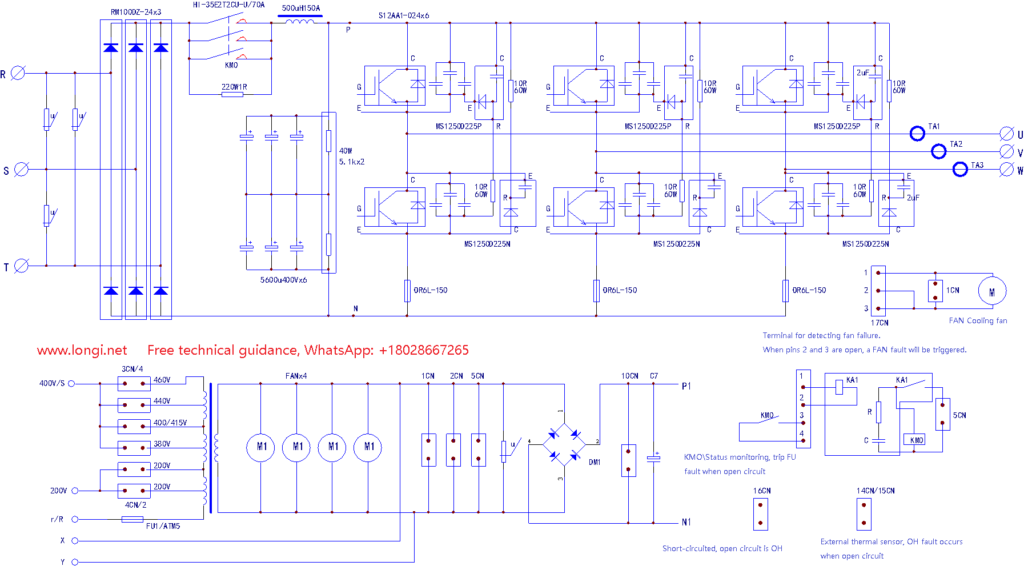
The structures of the main circuits of all inverters are similar or even identical. The main circuits of Yaskawa inverters and Taiwan Teco inverters are exactly the same. Later I observed that the control panels of the two machines are the same, and the control panel and parameter settings are also similar. It is found that the two machines are similar or even identical from hardware to software, which will bring a lot of convenience to installation, debugging and maintenance. As long as there is a technical data reference at hand, you can debug and repair the two devices.

When we open the shells of these two high-power inverters and check the main circuits, the six large rectangular box-shaped objects installed above the inverter modules (in parallel with the modules) will first arouse our interest – the model number MS1250D225P is connected in parallel with the upper arm IGBT tube of each phase, and the model number MS1250D225N is connected in parallel with the lower arm IGBT tube. To use a phrase from the Internet: What on earth is this? What is the purpose of installing it here?
Generally speaking, anything connected in parallel to the IGBT tube, whether it is a capacitor or a resistor-capacitor network, is set up to protect the IGBT tube. That is, when the tube is cut off, the energy formed by the reverse voltage is quickly consumed, providing a reverse current path to protect the IGBT tube from (in fact, it makes it bear less) the impact of reverse voltage. As we all know, whether it is a bipolar or field effect device, there is often a certain amount of surplus in the forward voltage, but the ability to withstand reverse voltage is extremely fragile. Therefore, the things connected in parallel to the IGBT tube can be said to complete this task of consuming reverse voltage.
It should be noted that the internal circuits of MS1250D225P and MS1250D225N were not opened for verification. After the module was damaged, these two devices were often intact, so it was not convenient to disassemble them after they were damaged. The internal circuit in the above figure was drawn based on measurement and speculation, and is only a reference for readers. I have searched a lot of information and searched on the Internet, but I have not found any information about this component. It is obviously easy to mislead to analyze the principle based on the speculation of the circuit. Therefore, the analysis of its principle is temporarily omitted.
However, after connecting such components in parallel to the module, it will bring us new experience in maintenance. See below.
According to the conventional maintenance method, after replacing the damaged module, before conducting the power-on test, we must cut off the P point in the above figure, connect two 25W (or 40W) bulbs in series, and then power on. In this way, if the inverter module circuit or drive circuit is abnormal, causing the two IGBT tubes of the upper and lower arms to short-circuit the DC power supply, the expensive IGBT module will not be damaged due to the current limiting effect of the bulb. Other brands of inverters connect small-capacity capacitors of the picofarad level in parallel at both ends of the tube. After powering on or starting the inverter, as long as the U, V, and W output terminals are unloaded, the bulb will not light up. But the performance of Yaskawa inverters in maintenance is different. Connect a bulb in series at point P, power on, and the bulb does not light up. It is correct, I breathed a sigh of relief; press the operation panel to start the inverter, and the bulb becomes bright! It is broken, the output module has a short circuit! This is my first judgment. Check the module and drive circuit during power outage, and there is no abnormality. Looking back at the circuit structure, after removing the MS1250D225P and MS1250D225N, the light bulb did not light up after starting the inverter. The three-phase voltage of the no-load output was normal. These two components and the external 10 Ω 80W resistor provided a current path of about 100 mA, making the 25W bulb bright. Sacrificing tens of watts of power consumption in exchange for higher safety of the IGBT tube is the characteristic of the module protection circuit of the Yaskawa inverter.
After the inverter is started without load, due to the relationship between components such as MS1250D225P and MS1250D225N, the inverter circuit itself forms a certain circuit path, which is not caused by the inverter module failure. This machine is a special case. The existence of a circuit path does not necessarily mean that the module is damaged. Observe which components provide the current path? When fresh experience solidifies into a fixed mindset, misjudgment of faults is inevitable.
The control power of the whole machine is obtained from a multi-tap transformer at the bottom of the figure. The short-circuit wires of sockets 3CN and 4CN are different, and the level of input voltage can be adjusted to ensure the accuracy of the secondary winding AC220V voltage. The cooling fan uses an AC220V power supply, which is filtered and used as the input of the switching power supply. When repairing the driver board alone, the terminals 2 and 3 of the fan; 3 and 4 of the contactor terminals; 14CN, 15CN, and 16CN must be short-circuited, and fault signals such as undervoltage (FU/LU), overheating (OH), and fan failure (FAN) must be manually eliminated, so that the CPU can output six pulse signals, which is convenient for checking the drive circuit.
2. Drive/protection circuit of “616G3-55kW Yaskawa inverter”

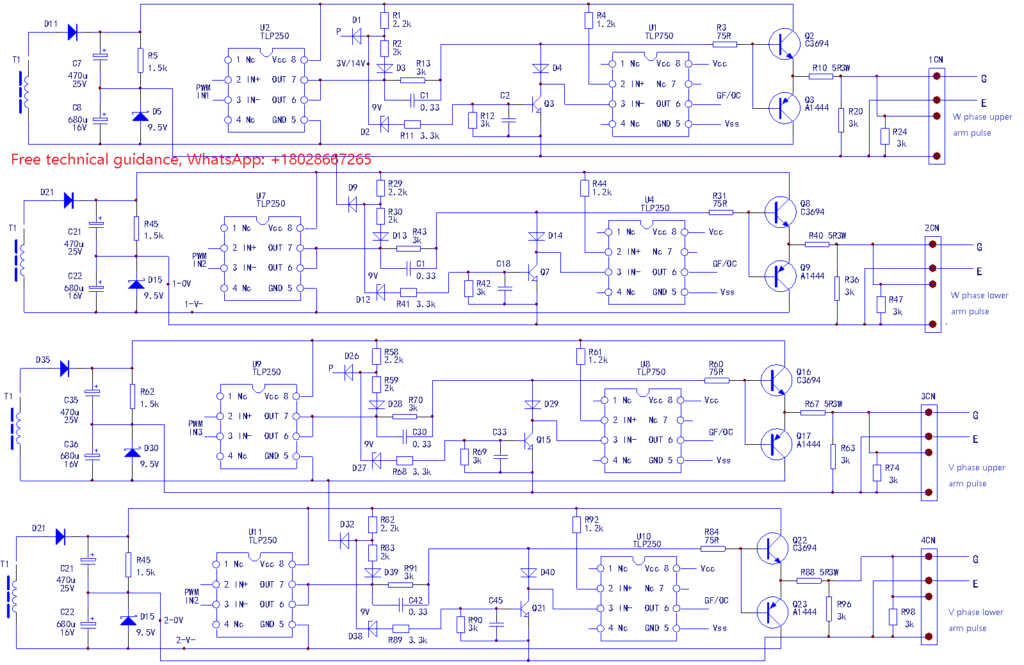
The types of drive circuits are similar. The most common ones we see are drive detection circuit (protection circuit) is also integrated. Although you can find circuit information about A3316J, etc., and you can see the internal unit block circuit diagram and the introduction of the circuit principle, you always feel a little confused about the specific composition of its protection circuit – the protection circuit inside the IC is indeed invisible and intangible. It happens that this circuit is a detection and protection circuits composed of ICs such as PC929 and A316J, in which the module fault circuit composed of discrete components, which makes it easier to understand the detection and protection action process. Slightly redrawing the pulse and protection circuit in the above figure, you can see how the IGBT tube voltage drop detection circuit implements the protection action on the module:

Circuit principle: The PWM pulse signal from the CPU pin is isolated and amplified by the U2 optocoupler and then sent to the module protection circuit. Under normal conditions, this pulse signal is amplified by the push-pull power amplifier circuit of Q2 and Q3 to directly drive the IGBT module. It is generally believed that the IGBT module is a voltage-type drive module, which is biased. The input gate-emitter junction capacitance of the IGBT tube just needs a transient large inrush current! This is why Q2 and Q3 are used for power amplification. The introduction resistor of the drive signal is also a 5 Ω 8W power resistor. In this sense, in essence, the IGBT module is still a current-type drive device. This is the author’s opinion, is it correct? When the current output capacity of the drive circuit is insufficient, the three-phase output current will be intermittent, the motor will vibrate, and a rumbling sound will be emitted. The principle of the pulse processing circuit can be found in other figures. The focus here is on how the protection circuit works.
When the inverter does not receive the start signal, the output pins 7 and 8 of U2 are cut-off negative voltages. If the 0V power line is used as the reference point, the voltage of pins 7 and 8 is about -9.5V (ignoring the saturation voltage drop of the internal tube). This negative voltage is introduced to the base of Q2 and Q3 through R13 and R3. Q2 is cut off due to reverse bias, Q3 is turned on due to positive bias, and the gate bias of the IGBT module is negative and is in the cut-off state. Resistors R1 and R2 divide +15V and negative -9.5V to obtain a 3V level. D9 is a voltage regulator with a breakdown voltage value of 9V. The voltage division value of R1 and R2 is not enough to cause it to break down, so Q3 has no bias current and is in the cut-off state. There is no input current to the photocoupler U1, so no fault signals such as GF (grounding) and OC (overload, short circuit) are returned to the CPU. When the CPU sends a drive pulse, the 7th and 8th pins of U2 become positive pulse voltages with a peak value of 15V, and the positive pole of D1 rises to +15V at this time. At this time,two situations occur: In one case, the module is good, and the IGBT tube is quickly turned on under the drive of the positive excitation pulse. It can be considered that the P and E points are short-circuited instantly. The negative terminal potential of D1 is instantly pulled to 0V, and the negative terminal potential of D2 is also pulled to below 1V. Because it does not reach the breakdown value of D2, Q3 still has no base bias current and is cut off; In another case, the module has caused the operating current to be too large due to abnormal load, or the IGBT tube is not turned on well due to the poor driving circuit itself such as Q3. The negative terminal of D1 is high potential and is cut off, and +15V causes D2 to break down through R1, Q3 is biased and turned on, and the positive pulse voltage of the base of Q2 is pulled to zero level, and the IGBT module loses the pulse and is cut off. At the same time, the conduction of Q3 generates the input current of U1, and U1 sends the module fault signal to the CPU. It can be seen that the protection circuit of this circuit first cuts off the driving pulse of the IGBT tube and sends out the module fault signal at the same time. The protection is timely and fast.
3. Drive/FU circuit of 616G3-55kW Yaskawa inverter

The protection circuit of the drive circuit implements protection actions and sends OC signals according to the tube voltage drop of the IGBT tube during the sending of the excitation pulse. According to the information, the on-state voltage drop of the IGBT module is about 3V under normal (rated current) conditions. When the tube voltage drop reaches 7V or more, it means that the current flowing through the IGBT module has exceeded 180% to 200% of Ie. At this time, the protection action is of course the faster the better. The purpose of setting up this protection circuit is to make up for the slow protection action of the subsequent current detection circuit such as the current transformer. The current detection circuit inevitably uses a large capacity filter capacitor, which makes the circuit have a certain time constant and slow response. The tube voltage drop detection circuit of the IGBT can be called a fast protection action circuit because of its rapid response, just like a fast action unit, which is used to deal with emergency events. The treatment of slight overcurrent and current limiting regulation is still implemented by the current detection circuit of the current transformer circuit.
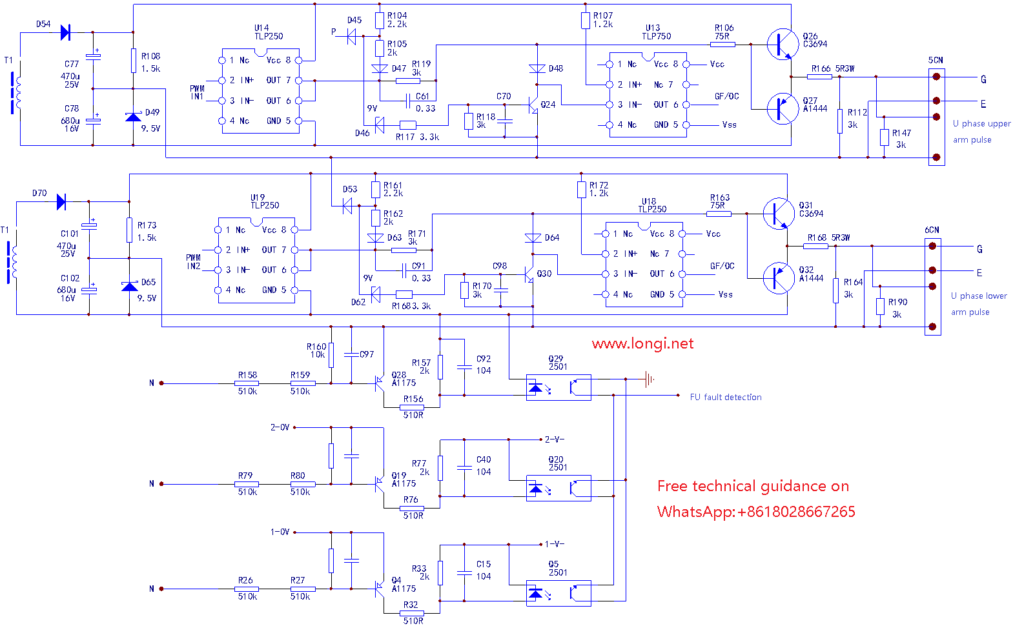
The drive circuit is also equipped with a fuse detection circuit. In general, a fast-blow fuse is connected in series at the P end of the DC circuit to implement module protection. However, this machine circuit has a fuse connected in series at each phase output module. The inverters produced by each manufacturer generally have the following trends: early products are inevitably crude, old and heavy, and their user control functions are not perfect, but there is a large margin in their production and selection of materials; they are conservative in protection performance, but they do not hesitate to add components that seem redundant now to ensure the reliability of the protection circuit. The early products of Yaskawa inverters were no exception. With the advancement of product technology and the fierce market competition, the functions of inverters have been improved, while the costs have been reduced, and there is even a suspicion of cutting corners. The operating reliability of inverters has also been compromised, and domestic inverters should take this as a warning.
The detection circuit of the three-way fuse blown is to compare the 0V line of the lower three-arm drive power supply with the N line of the main DC circuit to determine whether the fuse is normal. Under normal conditions, the 0V line and the N line of the drive power supply are connected through the fuse and are of equal potential. That is, the E pole of the lower three-arm IGBT tube is connected to the N line of the main DC circuit. Therefore, the base bias of the transistors Q4, Q19, and Q28 is zero. All three tubes are cut off. When the fuse of any phase output module is disconnected, the N line and the 0V line of the phase drive power supply produce a huge potential difference, and the transistor is turned on by positive bias. The three optical couplers Q5, Q20, and Q29 are connected into an OR gate circuit. The input signal of any optical coupler will be transmitted to the same output point, and the fuse signal of the fast insurance will be transmitted to the CPU, so that the CPU reports the FU (fuse) broken signal and refuses to accept the start signal.
There is also an interesting problem of the order of fault signal alarm of Yaskawa inverter. For example, when the power is on, a warning of the fault code is given for overheating, undervoltage, overcurrent, fan failure, fuse failure, etc., and the startup operation is refused; during the startup, the module fault detected by the module protection circuit is warned with the GF (ground fault) code. When the module fault is detected during operation, the OC (operating overcurrent, load short circuit, etc.) fault code signal is reported. The same signal output by the IGBT tube voltage drop detection circuit is output at different times (one is during the startup process, and the other is during the operation process), but the inverter reports two different fault codes (GF: ground fault; OC: overload or short circuit fault). Similarly, in the current and voltage detection circuits, the same means are sometimes used. The overcurrent or overvoltage signal reported by the same protection circuit may report different fault codes or take different treatment measures due to the different working states of the inverter (starting or running). All this depends on the ideas of the software designer. The control ideas of each manufacturer’s inverter must be similar. Pay attention to the relevant characteristics of the inverter fault alarm to facilitate efficient diagnosis of the fault.
When analyzing the protection circuit, you need to look at the main circuit and the drive (protection) circuit in two or three parts. Many drawings are broken down into individual unit circuits. Readers must strengthen their ability to read drawings in a comprehensive and coherent manner. This is a piece of advice I give you.


