
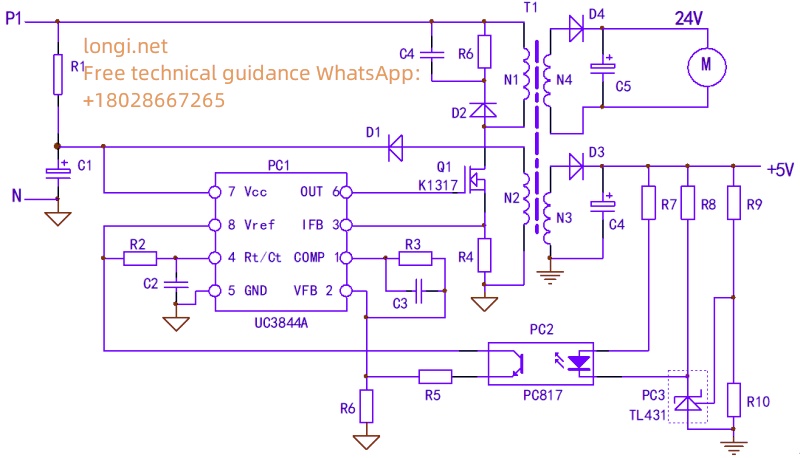
The switching power supply circuit of VFD can be completely simplified into the circuit model shown in the diagram, and the key elements in the circuit are included. And any complex switching power supply, after removing the branches, will still have a backbone like the one shown in the picture. In fact, in maintenance, it is necessary to have the ability to simplify complex circuits, and to identify these main threads in the seemingly disorderly extension of circuits. To learn from the skilled chef of Jieniu, train yourself that there is no overall switch power circuit in front of your eyes, only the direction of the various parts and veins – oscillation circuit, voltage stabilization circuit, protection circuit, and load circuit, etc.
Take a look at how many veins there are in the circuit.
- 1.Oscillation circuit: The leakage source and R4 of the main windings N1 and Q1 of the switching transformer are the paths for the working current of the power supply; R1 provides starting current; The self powered windings N2, D1, and C1 form the power supply voltage for the oscillating chip. The normal operation of these three links is a prerequisite for the power supply to oscillate.
Of course, the 4-pin external timing components R2, C2, and PC1 chip itself of PC1 also constitute a part of the oscillation circuit.
- 2,.Voltage stabilizing circuit: The+5V power supply of N3, D3, C4, etc., and components such as R7-R10, PC3, R5, R6 constitute the voltage stabilizing control circuit.
Of course, the PC1 chip and peripheral components R3 and C3 on pins 1 and 2 are also part of the voltage stabilization circuit.
3.Protection circuit: The PC1 chip itself and the 3-pin peripheral component R4 form an overcurrent protection circuit; The parallel D2, R6, and C4 components on the N1 winding form the protection circuit of the IGBT; In essence, the voltage feedback signal of the voltage stabilizing circuit, the voltage stabilizing signal, can also be regarded as a voltage protection signal. However, the content of protecting the circuit is not limited to the protection circuit itself. The initiation and control of the protection circuit are often caused by abnormalities in the load circuit.
- 4.Load circuit: N3 and N4 secondary windings and subsequent circuits are all load circuits. The abnormality of the load circuit will involve the protection circuit and the voltage stabilizing circuit, causing the two circuits to make corresponding protection and adjustment actions.
The oscillation chip itself participates in and constitutes the first three circuits. If the chip is damaged, all three circuits will strike together. The maintenance of three or four circuits is carried out under the premise that the chip itself is normal. In addition, like playing chess, we should use a global perspective and systematic approach to diagnose faults, and see the essence through phenomena. If there is a stop vibration fault, it may not be caused by damage to the oscillation circuit components. It may be a voltage stabilization circuit fault or an abnormal load circuit, which causes the internal protection circuit of the chip to start controlling and stops the output of PWM pulses. It is not possible to completely isolate each circuit for maintenance, and the appearance of a faulty component may exhibit the effect of “pulling one engine and moving the whole body”.
The oscillation chip itself participates in and constitutes the first three circuits. If the chip is damaged, all three circuits will strike together. The maintenance of three or four circuits is carried out under the premise that the chip itself is normal. In addition, like playing chess, we should use a global perspective and systematic approach to diagnose faults, and see the essence through phenomena. If there is a stop vibration fault, it may not be caused by damage to the oscillation circuit components. It may be a voltage stabilization circuit fault or an abnormal load circuit, which causes the internal protection circuit of the chip to start controlling and stops the output of PWM pulses. It is not possible to completely isolate each circuit for maintenance, and the appearance of a faulty component may exhibit the effect of “pulling one engine and moving the whole body”.
Switching power supply circuits often exhibit the following three typical fault phenomena (combined with Figures 3 and 9):
A、 The secondary load supply voltage is 0V. After the frequency converter is powered on, there is no response, and there is no indication on the operation display panel. The measured voltage of 24V and 10V at the control terminal is 0V. If the charging resistance or pre charging circuit of the main circuit is intact, it can be determined that there is a switch power supply fault. The maintenance steps are as follows:
1.First, use the resistance measurement method to measure whether there is any breakdown or short circuit phenomenon in switch Q1, and whether there is an open circuit in the current sampling resistor R4. The easily damaged component of the circuit is the switch tube. When it is damaged, R4 will increase in resistance or open circuit due to impact. The G-pole series resistor and oscillation chip PC1 in Q1 are often damaged by strong electrical shocks and need to be replaced simultaneously; Check for short circuits in the load circuit and eliminate them.
2.If the damaged parts are replaced or there are short circuited components that have not been detected, a power on inspection can be conducted to further determine whether the fault is in the oscillation circuit or the voltage stabilizing circuit.
Inspection method:
a、 First, check if there is an open circuit in the starting resistor R1. After normal operation, use an 18V DC power supply to directly power on pins 7 and 5 of UC3844 to separately power on the oscillation circuit. Measure that pin 8 should have a 5V voltage output; The 6 pins should have a voltage output of about 1V. The oscillation circuit is basically normal, and the fault is in the voltage stabilizing circuit;
If the voltage output of pin 8 is 5V, but the voltage of pin 6 is 0V, check the external R and C timing components of pins 8 and 4, and the peripheral circuit of pin 6;
If the voltage measured on pins 8 and 6 is 0V, the UC3844 oscillation chip is broken and needs to be replaced.
b、 Power on UC3844 separately and short circuit the input side of PC2. If the circuit vibrates, it indicates that the fault is in the peripheral circuit of the input side of PC2; The circuit still does not vibrate, check the PC2 output side circuit.
B、 Intermittent oscillation occurs in the switching power supply, where a “hiccup” or “squeaking” sound can be heard, or a “hiccup” sound cannot be heard, but when the display panel is operated, it lights up and turns off. This is a typical fault characteristic caused by abnormal load circuit, resulting in power overload and triggering overcurrent protection circuit action. The abnormal increase in load current causes a significant increase in the excitation current of the primary winding, forming a voltage signal of more than 1V at the current sampling resistor R4, which activates the internal current detection circuit of UC3844 and causes the circuit to stop vibrating; The overcurrent signal on R4 disappears, and the circuit starts vibrating again. This cycle repeats, causing intermittent oscillations in the power supply.
Inspection method:
a、 Measure the resistance values at both ends of the power supply circuit C4 and C5. If there is a short circuit, it may be due to a short circuit in the rectifier diodes D3 and D4; Observe the appearance of C4 and C5 for any bulging or liquid spraying, and remove them for inspection if necessary; There is no abnormality in the power supply circuit, which may be due to a short circuit fault component in the load circuit;
b、 Check the power supply circuit for any abnormalities, power on, and use the troubleshooting method to troubleshoot each power supply one by one. If the power supply terminal of the fan is unplugged, the switch power supply works normally, and the operation display panel displays normally, it indicates that the 24V cooling fan has been damaged; If the+5V power supply connector is unplugged or the power supply copper foil is cut off, and the switch power supply is working normally, it indicates that there are damaged components in the+5V load circuit.
C、 The supply voltage of the load circuit is too high or too low. The oscillation circuit of the switching power supply is normal, but the problem lies in the voltage stabilizing circuit.
The output voltage is too high, and the components of the voltage stabilizing circuit are damaged or inefficient, resulting in insufficient feedback voltage amplitude. Inspection method:
a、 Connect a 10k resistor in parallel to the output terminal of PC2, and the output voltage drops back. The output side voltage stabilizing circuit of PC2 is normal, and the fault lies in both the PC2 itself and the input side circuit;
b、 Parallel connection of a 500 Ω resistor on R7 results in a significant drop in output voltage. The optocoupler PC2 is in good condition, but the fault is low efficiency of PC3 or a change in the value of the external resistor component of PC3. On the contrary, it is PC2 defect.
If the load supply voltage is too low, there are three possible faults: 1. The load is too heavy, causing a decrease in output voltage; 2. Poor components of the voltage stabilizing circuit result in excessive voltage feedback signals; 3. The switch tube is inefficient, causing insufficient energy exchange in the circuit (switch transformer).
Inspection and repair methods:
a、 Remove the load circuits of the power supply branch one by one (note! Do not disconnect the load circuit by opening the power supply rectifier tube of that branch, especially the+5V power supply circuit with a voltage stabilizing feedback signal! The disappearance of the feedback voltage signal will cause abnormal increase in output voltage of each branch, and burn out large areas of the load circuit!) Determine whether the voltage drop is caused by excessive load; If the circuit returns to normal after cutting off a certain power supply, it indicates that the switching power supply itself is normal. Check the load circuit; Low output voltage, check the voltage stabilizing circuit.
b、 Check the resistance components R5-R10 of the voltage stabilizing circuit, and there is no change in value; Replace PC2 and PC3 one by one. If everything is normal, it indicates that the replacement components are inefficient and the internal resistance of conduction increases.
c、 If replacing PC2 and PC3 is ineffective, the fault may be low efficiency of the switch tube, or there may be problems with the switch and excitation circuit, which does not rule out the low efficiency of the internal output circuit of UC3844. Replace high-quality switch tubes and UC3844.
For general faults, the above troubleshooting methods are effective, but not necessarily 100% effective. If there are no abnormalities in the oscillation circuit, voltage stabilization circuit, or load circuit, but the circuit still has low output voltage, intermittent oscillation, or simply no response, this situation may occur. Don’t worry for now, let’s delve deeper into the cause of the circuit malfunction to help identify the faulty component as soon as possible. What other reasons can cause the circuit to not vibrate when the intermittent oscillation or stoppage of the circuit is not caused by the starting and stabilizing circuits?
(1) The R, D, and C circuits with parallel connection at both ends of the main winding N1 serve as a peak voltage absorption network, providing a discharge path for the magnetic field energy stored in the transformer during the switching period (reverse current channel of the switching tube), protecting the switching tube from overvoltage breakdown. When D2 or C4 experiences severe leakage or breakdown short circuit, the power supply is equivalent to adding a heavy load, causing the output voltage to drop significantly. U3844 lacks power supply, and the internal undervoltage protection circuit is activated, leading to intermittent oscillation of the circuit. Due to the parallel connection of components on the N1 winding, it is difficult to detect a short circuit and is often overlooked;
(2) Some switch mode power supplies have a protection circuit with an input power supply voltage (high voltage). Once the circuit itself malfunctions, the circuit will experience a false overvoltage protection action and the circuit will stop vibrating;
(3) Poor current sampling resistance, such as pin oxidation, carbonization, or increased resistance, can lead to an increase in voltage drop, resulting in false overcurrent protection and causing the circuit to enter an intermittent oscillation state;
(4) The rectifier diode D1 of the self powered winding is inefficient, and the forward conduction internal resistance increases, causing the circuit to fail to vibrate. Replacement testing is required;
(5) The quality factor of the switch transformer is reduced due to mold and moisture in the winding, and the original model transformer is used for replacement testing;
(6) The parameters of the R1 oscillation circuit vary, but no abnormalities are detected in the measurement, or the switching tube is inefficient. At this time, the circuit is checked and found to be normal, but it does not vibrate.
Repair method:
Change the existing parameters and status of the circuit to expose the fault! Try reducing the resistance value of R1 (not less than 200k Ω) so that the circuit can vibrate. This method can also be used as one of the emergency repair methods. Invalid, replace switch tube, UC3844, switch transformer test.
The output voltage is always slightly higher or lower, and cannot reach the normal value. Unable to detect any abnormalities in the circuit or components, almost all components in the circuit were replaced. The output voltage value of the circuit is still in a “barely and barely” state, sometimes seeming to work “normally”, but it makes people feel uneasy, as if they are neurotic, and I don’t know when an “abnormal performance” will occur. Don’t give up, adjust the circuit parameters to make the output circuit reach its normal value and reach its working state, so that we can rest assured. There are several reasons for the variation of circuit parameters:
- a、 Transistors are inefficient, such as a decrease in the amplification factor of the transistor, an increase in the internal resistance of conduction, an increase in the forward resistance of the diode, and a decrease in the reverse resistance;
- b、 The related dielectric loss, frequency loss, etc. of capacitors that cannot be measured with a multimeter;
- c、 Aging and parameter drift of transistors and chip devices, such as decreased light transfer efficiency of optocouplers;
- d、 Inductive components, such as switch transformers, have reduced Q values, etc;
- e、 The resistance variation of resistive components is not significant.
- f、 There are several factors involved in the above 5 reasons, forming a “comprehensive effect”.
- The “current” state of a circuit formed by various reasons is a “pathological” state. Perhaps we need to change our maintenance approach. Traditional Chinese medicine has a “dialectical treatment” theory, and we also need to use it. The next prescription is not to target a specific component, but to “regulate” the entire circuit, making it from “pathological” to “normal”. Just like this, the illness was treated with confusion and confusion.
- Repair method (slight adjustment of component values):
(1) Low output voltage:
a、 Increase R5 or decrease R6 resistance value; b、 Reduce the resistance values of R7 and R8 or increase the resistance values of R9.
(2) High output voltage:
a、 Reduce R5 or increase R6 resistance value; b、 Increase the resistance values of R7 and R8 or decrease the resistance values of R9.
The purpose of the above adjustments is to thoroughly inspect the circuit and replace inefficient components before proceeding. The purpose is to adjust the relevant gain of the stabilizing feedback circuit, so that the pulse duty cycle of the oscillation chip output changes, the energy storage of the switching transformer changes, and the output voltage of the secondary winding reaches the normal value, and the circuit enters a new “normal balance” state.
Many seemingly irreparable and difficult faults were repaired with ease after adjusting one or two resistance values.
During maintenance, attention should be paid to the following issues: 1. During the inspection and repair process of the switching power supply, the power supply to the IGBT module of the three-phase output circuit should be cut off to prevent abnormal driving power supply and damage to the IGBT module; 2. When repairing faults with high output voltage, it is even more important to cut off the+5V power supply to the CPU motherboard to avoid abnormal or high voltage damage to the CPU, resulting in the CPU motherboard being scrapped. 3. Do not interrupt the voltage stabilizing circuit, as it will cause an abnormal increase in output voltage! 4. The diodes in switch mode power supply circuits, used for rectification and protection, are both high-speed diodes or Schottky diodes and cannot be replaced by ordinary IN4000 series rectifier diodes. 4. After the switch tube is damaged, it is best to replace it with the original model. With such a developed network, the source of goods is not a problem and can generally be purchased. Many things can be purchased at cheap prices on Taobao, pay attention to quality!