
I. Introduction to the V&T V6-H Inverter Operation Panel Functions
1.1 Overview of Operation Panel Functions
The V&T V6-H inverter is equipped with an intuitive and user-friendly operation panel, providing convenient control and monitoring of the inverter’s operations. The operation panel features various buttons and indicators that allow users to perform various tasks such as setting parameters, monitoring operational status, and troubleshooting faults.
1.2 Setting and Resetting Passwords
Setting a Password:
- Enter the Password Function Code: Press the PRG button to enter the menu, and navigate to the password function code (P0.00).
- Set the Password: Enter the desired four-digit password and confirm it by pressing the PRG button again. The display will show “P.Set” indicating that the password has been successfully set.
Resetting a Password:
- Enter the Password Function Code: Press the PRG button to enter the menu, and navigate to the password function code (P0.00).
- Enter the Current Password: Enter the current password.
- Clear the Password: Set the password to “0000” and confirm by pressing the PRG button twice. The display will show “P.Clr” indicating that the password has been successfully reset.
1.3 Setting Parameter Viewing Levels
The V6-H inverter provides different menu modes to control the visibility of parameters, allowing users to customize the level of access based on their needs.
Menu Modes:
- Basic Menu Mode (P0.02 = 0): Displays all parameters.
- Quick Menu Mode (P0.02 = 1): Displays only commonly used parameters, ideal for quick setup.
- Non-Factory Default Menu Mode (P0.02 = 2): Displays only parameters that have been changed from their factory defaults.
- Recent Changes Menu Mode (P0.02 = 3): Displays the last 10 parameters that have been changed.
To change the menu mode, navigate to the function code P0.02, select the desired menu mode, and confirm by pressing the PRG button.
1.4 Restoring Factory Defaults
Restoring the inverter to its factory default settings can be useful when troubleshooting or resetting the inverter to its initial configuration.
Steps to Restore Factory Defaults:
- Enter the Function Code for Restoring Defaults: Navigate to the function code P0.01.
- Select the Restore Option: Set P0.01 to “2” to restore all parameters (except motor parameters) to their factory defaults. Alternatively, set P0.01 to “5” to restore all parameters, including those in the reserved areas.
- Confirm the Operation: Press the PRG button to confirm the setting. The inverter will then restart and load the factory default parameters.
1.5 Setting the Maximum Frequency to 3000Hz
The V6-H inverter supports a maximum output frequency of up to 3000Hz, making it suitable for applications requiring high-speed motor control.
Steps to Set the Maximum Frequency:
- Enter the Basic Function Parameters: Navigate to the function code P0.11.
- Set the Maximum Output Frequency: Enter “3000” and confirm by pressing the PRG button. This sets the maximum output frequency of the inverter to 3000Hz.
II. Implementing Terminal Forward/Reverse Control
The V&T V6-H inverter provides multiple methods for controlling the direction of rotation of the motor, including through terminal inputs. This section describes how to set up terminal forward/reverse control.
2.1 Terminal Configuration for Forward/Reverse Control
To control the motor’s direction of rotation using terminal inputs, the inverter’s control terminals must be properly configured.
Steps to Configure Terminal Forward/Reverse Control:
- Identify the Forward and Reverse Terminals: Typically, the forward and reverse terminals are labeled as FWD and REV, respectively.
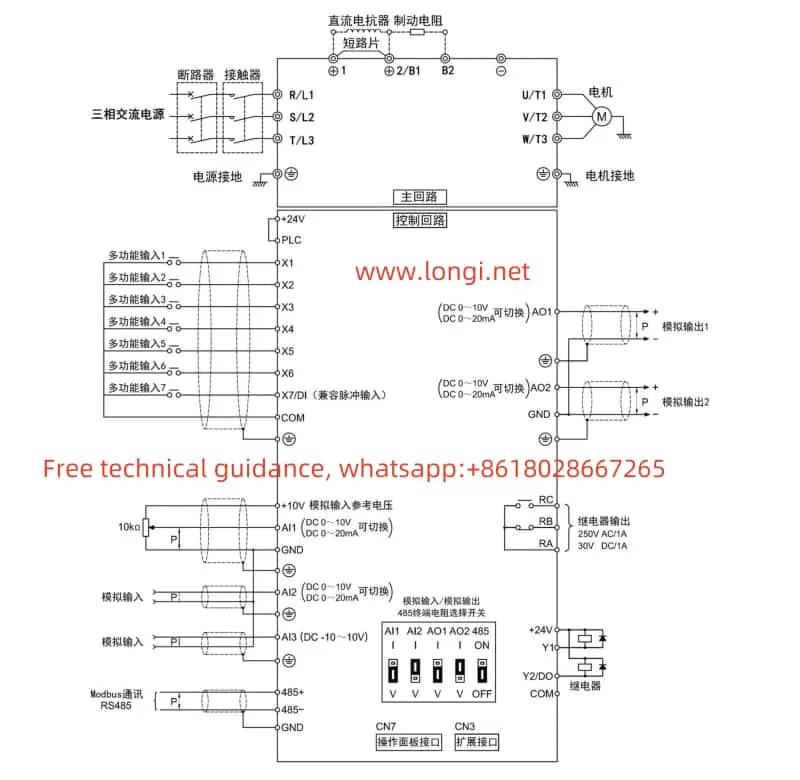
- Set the Terminal Function: Navigate to the function codes P5.00 to P5.06 (corresponding to terminals X1 to X7) in the multi-function input parameters (P5 group). Set the desired terminal (e.g., X1) to function “9” (forward/reverse control).
- Connect the Terminals: Connect the forward and reverse control signals from the external control system to the corresponding terminals on the inverter.
- Configure the Run Command Source: Ensure that the run command source is set to terminal control (P0.06 = 1). This allows the inverter to respond to the forward and reverse control signals from the terminals.
2.2 Operating the Inverter in Forward/Reverse Mode
Once the terminal configuration is complete, the inverter can be operated in forward/reverse mode by controlling the signals applied to the forward and reverse terminals.
Operating the Inverter:
- Forward Rotation: Apply a signal to the FWD terminal to start the motor in the forward direction.
- Reverse Rotation: Apply a signal to the REV terminal to start the motor in the reverse direction.
- Stopping the Motor: Remove the signal from both the FWD and REV terminals to stop the motor.
By following these steps, users can easily configure and operate the V&T V6-H inverter for terminal forward/reverse control, enabling precise motor control in a wide range of applications.
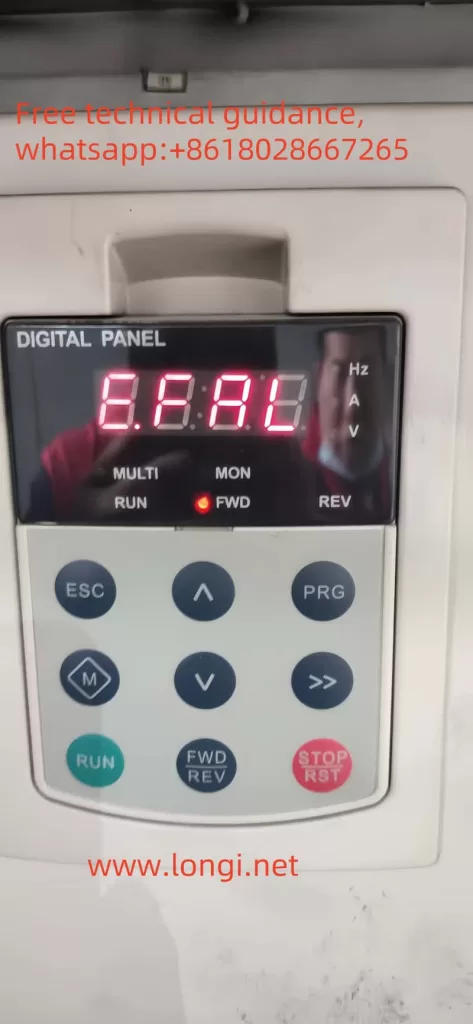
III. Solution to E.FAL Fault
The E.FAL fault code on the V&T V6-H inverter indicates a problem with the fan, specifically a fan alarm. This fault can occur due to various reasons such as fan malfunction, overheating, or wiring issues.
3.1 Troubleshooting Steps for E.FAL Fault
Steps to Troubleshoot and Resolve E.FAL Fault:
- Check the Fan Operation: Visually inspect the inverter’s cooling fan to ensure it is spinning properly. If the fan is not operating, it may need to be replaced.
- Check the Fan Wiring: Verify that the fan wiring is correct and free of damage. Loose or damaged wires can prevent the fan from receiving power.
- Check the Fan Sensor: The inverter may have a sensor to monitor fan operation. Ensure that the sensor is functioning correctly and not obstructed.
- Environmental Conditions: Consider the ambient temperature and ensure that the inverter is not overheating due to poor ventilation or high ambient temperatures.
- Reset the Inverter: If no issues are found with the fan or wiring, try resetting the inverter by turning it off and on again. This may clear the fault code if it was caused by a temporary issue.
3.2 Preventive Measures
To prevent future occurrences of the E.FAL fault, consider the following preventive measures:
- Regular Maintenance: Schedule regular maintenance checks to inspect the fan and other cooling components.
- Cleanliness: Keep the inverter and its surroundings clean to prevent dust and debris from obstructing the fan or cooling system.
- Ventilation: Ensure adequate ventilation around the inverter to prevent overheating.
- Monitoring: Use the inverter’s monitoring features to keep track of operating temperatures and fan status.
By following these guidelines and troubleshooting steps, users can effectively use the V&T V6-H inverter’s operation panel, configure terminal forward/reverse control, and resolve the E.FAL fault when it occurs.